I know I am a bad blogger and I still haven’t told you about how we made our own wedding invitations, but that DIY project was a HUGE undertaking. Honestly, I’m not completely sure how to walk you through the process step by step … YET. So instead I started thinking maybe I would just begin by sharing our DIY rehearsal dinner invitations.
After determining the location, invite list and all that fun stuff for the rehearsal dinner I decided we (the husband and I) should DIY own rehearsal dinner invites. We had left over card stock from the wedding invite inserts as well as extra envelopes (from our DIY Calligraphy). I mean it would have been such a waste not to take advantage of the left over paper materials, right?!?!?! ;)
Early on I found Wedding Paper Divas. They have fabulous invitations for various occasions, in fact it is the website we purchased our save the dates from. I quickly found this rehearsal invitation, which served as my inspiration for our DIY invites.
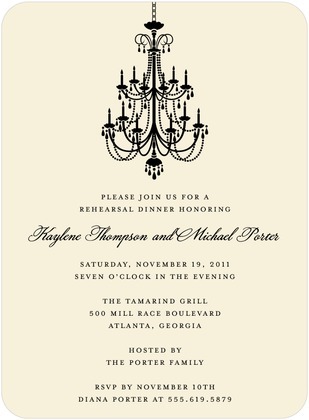
Image Credit: Wedding Paper Divas
What you need:
- Card Stock or some kind of nice paper.
- Printer with Ink
- Paper Cutter
- Corner rounder punch
- Photoshop or MS Word
Photoshop has a 30 day FREE trail you can download. We used a 30 day trial to create the initial draft of our wedding invitations. In the end we ended up purchasing Photoshop. We planned to use it not only for wedding stuff, but also for my budding photography hobby! If you plan to go the 30 day trial route, make sure to save the final version of your invitation as a PSD, JPG and TIFF file. This will ensure you are able to print the design even after your trail expires.
To ensure we could use some of our left over envelopes, I knew the invitations would need to be 5×7. Once I had the size I found a free image online of a chandelier and downloaded it. From there I Googled rehearsal dinner text and placed it on the initial version of the invite. After that it was just a matter of finding a layout we liked as well as fonts.
The majority of the text is in a renaissance font, which is free to download! Then for our names I used the same font we used on our invitations for our names, again a free font you can download. I felt using a little of the same font as the wedding invitations tied everything together.
I didn’t take a lot of pictures of the process, which is a bummer, so I can only really describe what I did. I printed two invites on each piece of card stock and then used my handy dandy paper cutter to make them 5×7. I printed a number of test versions on plain paper before using the card stock.
This is one of the test versions, please excuse the crappy blackberry camera shot:

I had printed almost all of the rehearsal dinner invites when I remembered I had purchased a paper rounder punch. I decided to go ahead and use one of my test invites and round the corners to see how it looked. I ended up loving it and the husband was in agreement. A bunch of punches later we had rounded edges instead of sharp corners.
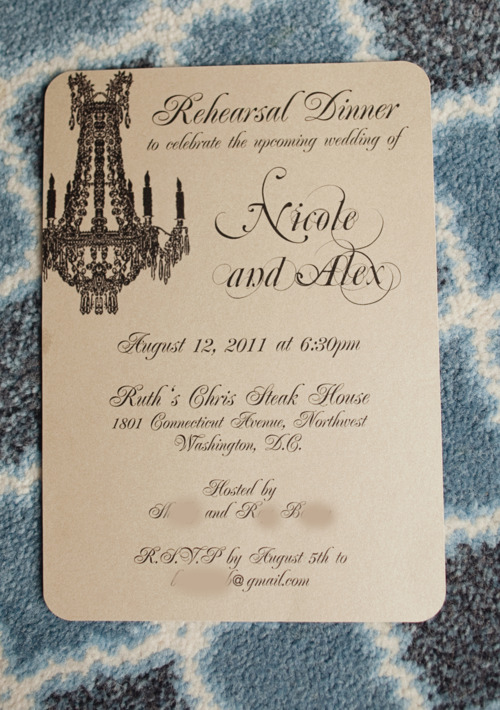
Here’s what the rehearsal dinner invitation looked like totally finished:
Here are a couple of extra tips:
- SPELL CHECK!
- Print test versions on plain white paper before doing a sample on your nice card stock.
- Print using High resolution.
- Make sure you have enough paper. You will need extra for test prints as well as if you detect a mistake. Or if like me your ink cartridge starts to die so some invites are better than others.
- Start early. Even though you don’t have to print as many rehearsal dinner invitations as wedding invites (usually) they still take time. Better not to be up against a deadline.
Happy Planning!
Don’t forget to leave your tidbit by commenting below :)