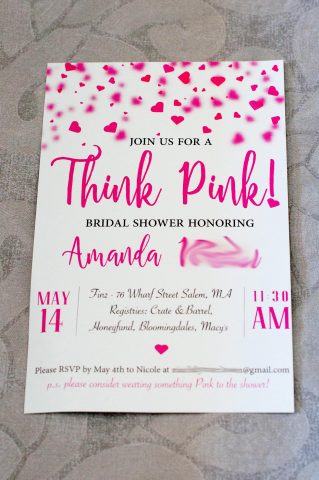
My little sister is getting married.  Eeeekkkk!!!  It still doesn’t feel quite real that my baby sister is getting married this summer.  Seriously, when did she go from being a little girl with wild banana curls to a beautiful, (and very grown up) young woman?

For as long as I can remember my sister has loved the color pink.  Sometime during the planning of my own wedding, I made an off hand comment that when she got married her bridal shower theme would be ‘Think Pink’.  So when the bridal shower planning began it seemed only fitting to follow through with ‘Think PINK!’ theme.

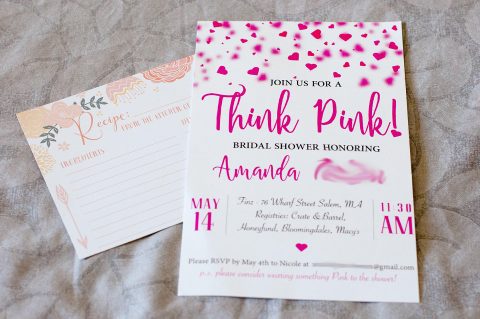
Creating invitations is one of my favorite creative things to do in preparation for a party.  Invitations set the stage for an event.  They serve as the guests’ first glimpse of what is to come.  So I wanted to give the guests a small taste of the event while providing them with all the details they need.

After reviewing a ton of invitations, which provided ample inspiration, I started designing the Think PINK bridal shower invitation.  The bridal shower invitations took a few iterations.  All the details of the invite from the font and color to the wording and design had to be spot on.

Here is the final product:

Think Pink! Bridal Shower Invitations - Front of Invitation | Life's Tidbits

Think Pink! Bridal Shower Invitations - Back of Invitation | Life's Tidbits

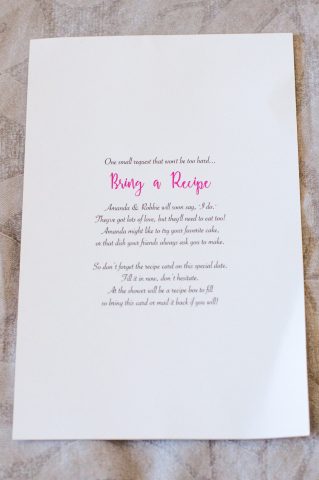
With the bridal shower invitation I enclosed a recipe card for each of the guests.  My sister has been getting into cooking over the past few years; this seemed like the perfect way to build her recipe collection.  Originally, I had planned to design and print custom recipe cards, however time got away from me and I ended up purchasing recipe cards online instead.

Think Pink! Bridal Shower Invitations - Front of Invitation with Recipe Card | Life's Tidbits

Think Pink! Bridal Shower Invitations - Back of Invitation with Recipe Card | Life's Tidbits
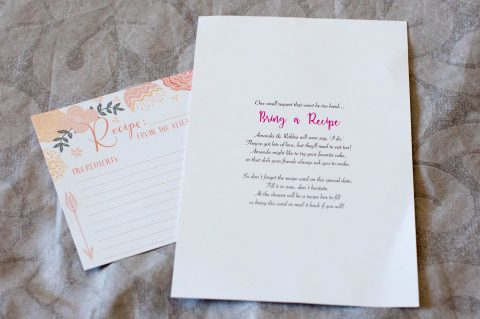
Here’s the copy for the back of the invitation {it’s kind of hard to read in the pictures}:

One small request that won’t be too hard…

Bring a Recipe

{Bride Name} & {Groom Name} will soon say, “I do.” They’ve got lots of love, but they’ll need to eat too!{Bride Name} might like to try your favorite cake, or that dish your friends always ask you to make.

So don’t forget the recipe card on this special date. Fill it in now, don’t hesitate. At the shower will be a recipe box to fill so bring this card or mail it back if you will!

All in all, I am very happy with how the invitation turned out.  My sister was very pleased with the bridal shower invitation design, which was the most important thing.

signiture_nicole

Share

When I decided to throw my friend’s baby shower I immediately started searching Pinterest and Google for inspiration.  I quickly fell in love with all the details of “Little Man” aka “Mustache” baby shower / birthday parties I found.

With the theme chosen the search for an invitation began.  Although initially the plan was to purchase pre-made invitations, I soon decided to try my hand at designing my own invitation.  I figured if the design wasn’t nailed down in time I could always order one of the many available options.

The invite was created PhotoShop and the mustache graphics purchased from ShutterStock.  It took a number of iterations, but the end result was exactly what I had envisioned!  Although I had successfully DIY’ed our wedding invitations, I wasn’t sure I would have success with baby shower invites.  Before revealing the final product to my husband, parents and sister I made them promise to give me their brutally honest opinions.  With their stamp of approval I moved forward with ordering the baby shower invites from Overnight Prints.

Font of the Invitation (JPEG Version):

DIY Little Man / Mustache Baby Shower Invitation |  Life's Tidbits

Back of the Invitation (JPEG Version):

DIY Little Man / Mustache Baby Shower Invitation |  Life's Tidbits

When they arrived in the mail I was ecstatic and hopeful the printed version would meet my expectations.  I was very pleased with the quality of the paper, printing and turnaround time of my order!  I kind of wish they looked a little shiny and/or glossy, but the matted is probably for the best.

DIY Little Man / Mustache Baby Shower Invitation |  Life's Tidbits

In an effort to save myself time, as well as spare everyone my horrible handwriting, I reused my DIY wedding calligraphy directions to print the address and return address on all the envelopes.  The font for the addresses is Lucida Calligraphy, which is a free font.

The invitations/envelopes are completed and in the mail.  Now it’s time to focus on finalizing the decorations, menu and shower games for the shower!!

So I mustache you … what do you think of the DIY baby shower invitations?

Happy DIY!

If you liked this post, please add your tidbit by commenting below!

Share

I know I am a bad blogger and I still haven’t told you about how we made our own wedding invitations, but that DIY project was a HUGE undertaking. Honestly, I’m not completely sure how to walk you through the process step by step … YET.  So instead I started thinking maybe I would just begin by sharing our DIY rehearsal dinner invitations.

After determining the location, invite list and all that fun stuff for the rehearsal dinner I decided we (the husband and I) should DIY own rehearsal dinner invites.  We had left over card stock from the wedding invite inserts as well as extra envelopes (from our DIY Calligraphy).  I mean it would have been such a waste not to take advantage of the left over paper materials, right?!?!?! ;)

Early on I found Wedding Paper Divas. They have fabulous invitations for various occasions, in fact it is the website we purchased our save the dates from.  I quickly found this rehearsal invitation, which served as my inspiration for our DIY invites.

Image Credit: Wedding Paper Divas

What you need:

Photoshop has a 30 day FREE trail you can download.  We used a 30 day trial to create the initial draft of our wedding invitations. In the end we ended up purchasing Photoshop.  We planned to use it not only for wedding stuff, but also for my budding photography hobby!  If you plan to go the 30 day trial route, make sure to save the final version of your invitation as a PSD, JPG and TIFF file. This will ensure you are able to print the design even after your trail expires.

To ensure we could use some of our left over envelopes, I knew the invitations would need to be 5×7.  Once I had the size I found a free image online of a chandelier and downloaded it. From there I Googled rehearsal dinner text and placed it on the initial version of the invite.  After that it was just a matter of finding a layout we liked as well as fonts.

The majority of the text is in a renaissance font, which is free to download!  Then for our names I used the same font we used on our invitations for our names, again a free font you can download.  I felt using a little of the same font as the wedding invitations tied everything together.

I didn’t take a lot of pictures of the process, which is a bummer, so I can only really describe what I did.  I printed two invites on each piece of card stock and then used my handy dandy paper cutter to make them 5×7. I printed a number of test versions on plain paper before using the card stock.

This is one of the test versions, please excuse the crappy blackberry camera shot:

I had printed almost all of the rehearsal dinner invites when I remembered I had purchased a paper rounder punch. I decided to go ahead and use one of my test invites and round the corners to see how it looked.  I ended up loving it and the husband was in agreement.  A bunch of punches later we had rounded edges instead of sharp corners.

Here’s what the rehearsal dinner invitation looked like totally finished:

Here are a couple of extra tips:

  1. SPELL CHECK!
  2. Print test versions on plain white paper before doing a sample on your nice card stock.
  3. Print using High resolution.
  4. Make sure you have enough paper.  You will need extra for test prints as well as if you detect a mistake. Or if like me your ink cartridge starts to die so some invites are better than others.
  5. Start early.  Even though you don’t have to print as many rehearsal dinner invitations as wedding invites (usually) they still take time.  Better not to be up against a deadline.

Happy Planning!

Don’t forget to leave your tidbit by commenting below :)

Related Posts Plugin for WordPress, Blogger...
Share