While doing “married things” {phrase coined by the husband} we ended up at The Container Store.  Clearly this is one of those places like Target or Bed Bath and Beyond, where I find things I never knew I needed but while we are there I think I really do NEED them.  I mean there is no reason we should have spent 1+ hours at The Container Store when it was sunny and 80 plus degrees outside.  But anyways, while walking up and down each aisle we ended up with quite the large cart of stuff we “needed”.

One of the many items in our cart was elfa kitchen storage.  Our condo is the first place I’ve lived where I haven’t had to use cabinets to store food.  The pantry is great and has really come in handy for storing items not eatable as well like batteries, lunch boxes, cook books and dish towels.  As a result our pantry has been pretty much over full since moving in.  We were hoping the elfa storage would expand the pantry a little bit.

Installation was very easy.  Hold the long rod up to the back of the door and mark the places where the screws go.  We went ahead and drilled the holes a little to get it started and make the screw go in easier.
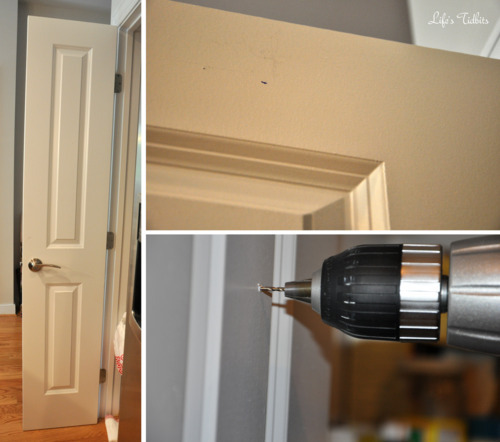
We held up the rod and put two screws into the door to hold the rod in place.  Before fulling anchoring it to the door we ensured it was level.  It was so we put all the screws securely into the door, clipped on the baskets and we were done.  The great part about the baskets are they come in standard and narrow.  We purchased the narrow baskets to ensure they wouldn’t hit the shelving in the pantry.
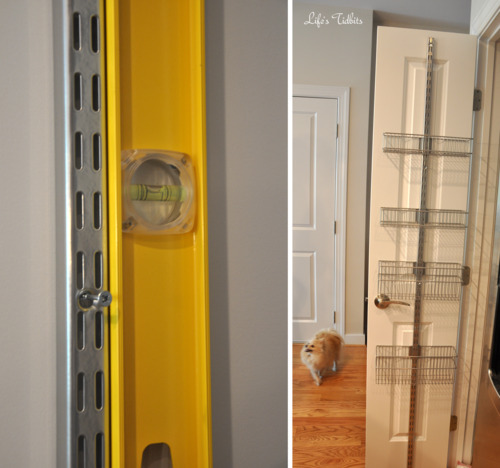
Initially we purchased 4 baskets.  We were pleased to see there was plenty of room for 2-3 more baskets.  Back to the container store we went and purchased two additional baskets.  We are loving the new storage and the way the baskets help with organization!!

What do you think of our new expanded pantry?

Happy home improvements!

Don’t forget to leave your tidbit by commenting and/or add Life’s Tidbits to your RSS Reader :)

Share

When we toured the condo, we eventually ended up buying, I didn’t notice the cabinets didn’t have hardware on them.  In fact I am not even sure I would have ever noticed they were missing (until we moved in) unless the husband had pointed it out.  At first we assumed the hardware just hadn’t been installed yet; we were wrong.  Apparently the builder purposely didn’t add knobs to the cabinets. In his experience buyers “don’t usually like” the hardware he chooses and therefore all the units in the building come sans knobs in the kitchen.

This missing knobs tidbit also showed up on the report from the home inspector.  The seller agreed to have the hardware installed for us if we purchased and provided the knobs prior to closing.  Knobs were at the very bottom of our to do list in the weeks prior to closing. We had to start packing, work, attend a wedding, travel to NY for a family event and oh so much more. As you can imagine the whole not having hardware in the kitchen didn’t really take precedent.

We had perused knobs at Home Depot, but hadn’t loved anything.  Then the husband found Knobdepot.  Our knobs had to be brushed nickel in order to match the appliances/faucet in the kitchen.  This was kind of nice because it helped us narrow down our choices.  In the end we ended up choosing these.  Modern with a twist {pun intended … hehehehe}.

Since we didn’t get the knobs purchased prior to closing we were either going to have to hire someone to install them or do it ourselves.  My handy husband was pretty convinced he would be able to install the hardware himself.  Our knobs came with a free template, however it wasn’t the right size?!?! I mean really, why send us a free template that is too small for our knobs?  LUCKILY the husband is handy, like I said, and he went ahead and modified the vertical and horizontal template to be usable.

Here’s how they look:

Not so sexy, but extremely effective!

We learned something very important when installing the first knob – drill through the front of the cabinet, not the back. When we drilled from the back to the front there was some splintering on the front of the cabinet :(  Luckily we did the test on a cabinet that isn’t front and center.  Also we added masking tape to the inside of the cabinets to help minimize the splintering on the inside.

Hold the template up to the cabinet door.

Drill a little bit through each of the two holes to make a mark on the cabinet.

Check to make sure the holes are level and then drill through each of the holes.

Screw the knobs onto the cabinet and check that it is level again.  Along the way we made small modifications to the holes to make sure they were level.

After they are all screwed in it looked like this:

I love how the cabinets look.  Since we got use to not having knobs I still find myself grabbing the top of the cabinet to pry it open. I’ve got to start taking advantage of our new bling bling.

Happy home improvements!

Don’t forget to leave your tidbit by commenting below :)

Related Posts Plugin for WordPress, Blogger...
Share