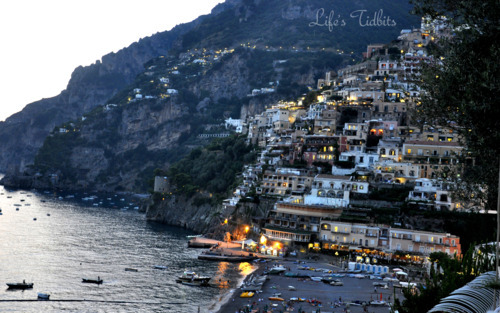
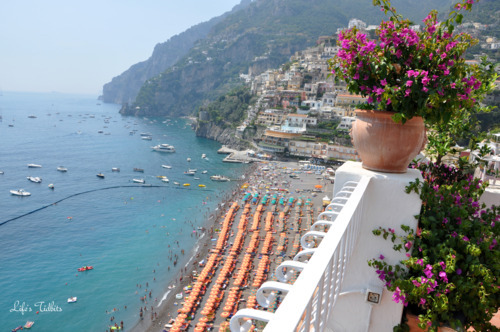
Our two week honeymoon began in Positano, Italy.  It is towards the southern end of Italy and has some fantastic views of the Amalfi Coast!  Positano also has beaches which was a must have for the first stop on our honeymoon.

Screen Shot of GoogleMaps

We decided to splurge a little in Positano. It was our time to relax, soak in being married and decompress after all that wedding planning.  We spent an evening researching hotels in Positano using TripAdvisor and Rick Steve’s guide.  When we finally stumbled upon Hotel Marincanto; I was immediately sold.  The pictures showed phenomenal views and was within walking distance of the beach!

After a red eye flight from DC to Paris and finally to Naples we arrived excited, but exhausted.  Luckily my husband had hired a driver to take us from Naples to Positano.  The streets are crazy windy and narrow. I was VERY happy to not be driving myself in a foreign country while totally exhausted!!  Hiring a driver was probably one of the best decisions we made.

Day 1:

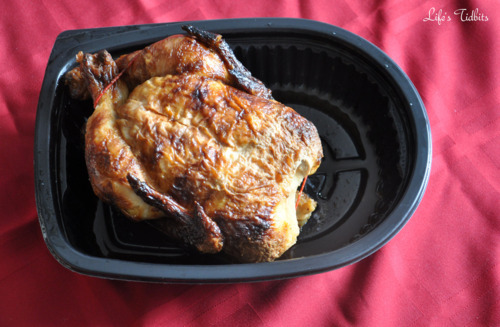
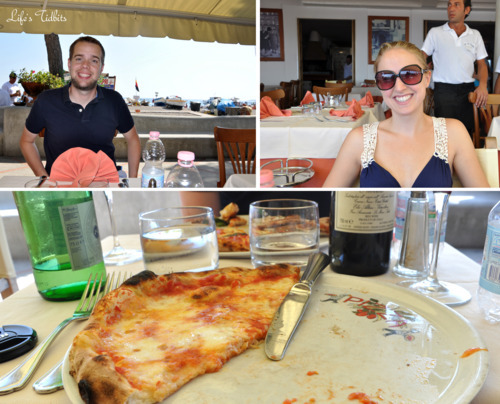
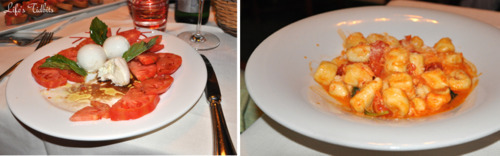
We arrived in Positano and checked into the hotel.  We were both STARVING so we changed quickly and walked down to the beach.  Unfortunately we arrived at a weird time and had to walk around for a while before finding a place serving food.  We stumbled upon Le Tre Sorelle.  It had the MOST amazing pizza.  The best pizza we had all vacation.  Seriously I dream about this pizza it was so good. We went all three days for lunch.  Ok I think you now get how amazing the pizza was!

Honeymoon in Positano Italy. Favorite restaurants and places to stay | Life's Tidbits

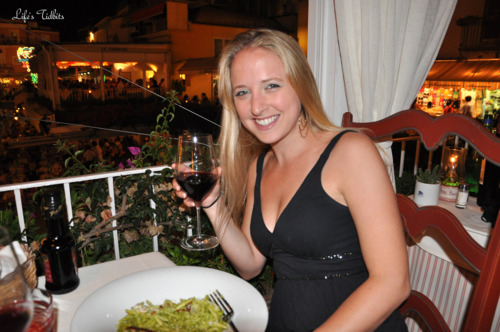
After lunch we walked around and then retired to our hotel for a siesta.  After a much needed nap we watched the sunset on our balcony.  Such an amazing view!

Honeymoon vacation Positano, Italy | Life's Tidbits

For dinner we went to Ristorante La Cambusa.  It was okay, but nothing to write home about.  For our first night it was fine, but I’m assuming there are other better options for your first evening in Italy!  My husband had been instructed that when you pass a gelato place you stop … always.  So as we strolled (or really rolled) back towards the hotel we stopped for our first taste of gelato.

OMG the lemon gelato was to die for and totally worth feeling extra stuffed.  :)  Off to bed we went excited to spend the entire next day at the pool or beach!

Day 2:

Reading, sun tanning and have a beer by the pool took up the whole day!  We couldn’t have asked for more perfect weather.  We chose to stay by the pool instead of going to the beach where we would have to rent mattalas.  Considering the beach was rocky there wasn’t any real need to be there when we had a gorgeous pool at our disposal, plus the view is so perfect from the suntanning patio.

Honeymoon vacation Positano, Italy | Life's Tidbits

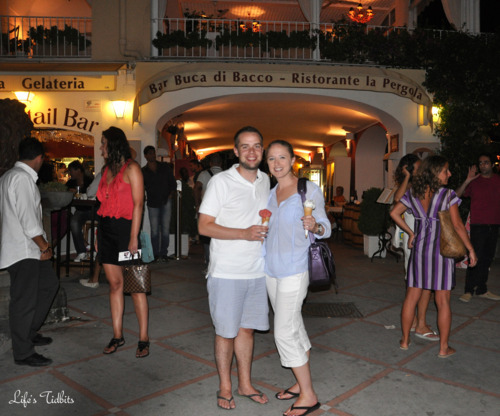
We made the trip down to the beach for lunch at Le Tre Sorelle.  When it was time to make some decisions about dinner out came the iPhone and directly to Trip Advisor app we went.  Buca di Bacco had some good reviews and we remembered walking past it the night before.  Boy did it not disappoint.  The mozzarella melted in our mouths and the gnocchi was the best we’ve ever had.  If I remember correctly it was called Sorrento gnocchi.  Either way have it if you ever go it was to die for.

Sorrento Gnocchi and tomato salad in Positano, Italy - Traveling, honeymooning, vacation | Life's Tidbits

The night ended with a “gelato cap” and was the perfect end to our second day.

Day 3:

The day was very much like day 2.  Time at the pool and then off to our favorite (and only) lunch place in Positano.  We were sad our time in Positano was coming to an end.

Our last dinner was at Ristorante Covo Dei Saraceni.  It was an amazing choice for our last night with top notch seafood and pasta!

Food and wine in Positano, Italy - vacation, honeymoon, traveling | Life's Tidbits

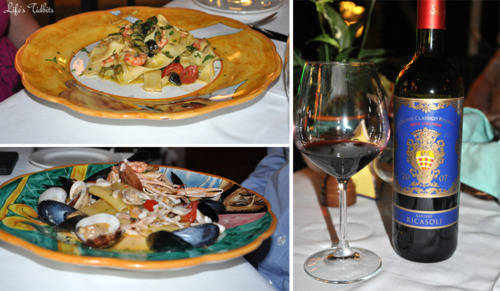
We made friends with a couple who was also honeymooning at the table next to us. It turned out that the woman works in my hometown as a school teacher.  What a small small world we live in!  After dinner we hit up a new gelato place and ended up getting the lemon gelato for the third day in a row. Some how it just didn’t get old.

Ciao and see you in Sorrento!

Happy vacationing!!

Signiture_Nicole


Share

We had received a few wedding and other party invitations with super pretty writing on the envelopes.  Specifically gorgeous calligraphy!  Despite loving calligraphy I couldn’t justify the cost of paying for hand done calligraphy on something 99.9% of people just throw away after opening the invitation.

So we went the route of DIY calligraphy.  By DIY I mean using the computer and printer, because my handwriting is less than ideal even for meeting notes. :)

Materials Needed:

First the husband and I went online and viewed a ton of different free calligraphy fonts.  After much deliberation we downloaded a free calligraphy font

We had a little over 100 invitation to address.  The envelopes we chose came in packs of 50, 250 and 500.  Clearly the 500 was over doing it, but we couldn’t decide if we should order 150 (3 packs of 50) or just go for the 250 pack of envelopes.  In the end we decided we could find other uses for the extra envelopes and went ahead and purchased 250 envelopes.

How to Create Envelopes in MS Word:

  1. Open MS Word
  2. Click Page Layout > Size > More Paper Sizes
  3. From the Paper Size drop down choose Custom Size
  4. For me I had A7 envelopes (5-1/4” x 7-1/4”)
  5. So within the width I entered 7.25 and height 5.25
  6. Click OK

DIY Calligraphy / Wedding Envelopes | Life's Tidbits

For the return address I decided to use a standard “block” font called “Adobe Caslon Pro”.  I have only received one invitation where the return address was calligraphy font, but I think this is all a matter of preference.  And since it’s DIY you can make it fit your style and font preference.

  • Type in a test address > select font, size and line spacing

Ours looked like this …

DIY Calligraphy / Wedding Envelopes | Life's Tidbits

  • Save the file someplace on your computer and clearly mark it as the return address portion of the envelope.
  • Once you are happy with how it looks print a TEST version.  I suggest plain white paper.
  • Once you are happy with how it looks go ahead and print a test version on an envelope.
  • Confirm everything looks perfect and make tweaks as necessary. Ensure you’ve spell checked as well.

At this point you can go ahead and print return addresses on all your envelopes.  If you have 130 invitations to send make an extra 10-15 envelopes with return addresses.  This will save you time if you have to reprint an address.  As you print them make sure the envelopes don’t fall on top of each other in the tray … it can cause smudging.  We lined our bookshelves with the envelopes and allowed them to dry over night before putting them in a pile.  Our apartment looked like a little printing press! :)

With the return address completed you are ready to start on the front of the envelope.  The steps are the same as above.

  • Type in a test address > select font, size and line spacing
  • Print tests on plain paper and then an envelope.
  • I think it took us at least 5-7 printed drafts to be happy.
  • Once you are happy go ahead and add all the addresses into the word file (click save periodically to ensure you don’t loose your work people!!).

Here’s what ours looked like in Word:

DIY Calligraphy / Wedding Envelopes | Life's Tidbits

A Couple Tips:

  1. Print High resolution.  I printed the 1st few on standard.  They looked nice, but when the husband suggested printing on High resolution it looked better.  This does use a little more in than standard, but in the grand scheme of things I don’t think it really cost us any additional money.
  2. Buy extra envelopes.  As I already mentioned print tests on regular white paper for a while until you think it is right.  You will need envelopes for testing, but you will also find that people move or you have an address incorrect and have to reprint.  Extra envelopes purchased up front save you heartburn later, promise!
  3. Start early.  Everyone laughed when I started printing envelopes 3 months before we sent them.  Giving myself a lot of time to complete the project reduced my stress level and made it more fun. Plus it ensured I gave the envelopes plenty of time to dry before additional printing or sending.  Nothing was smudged because we were rushing.

Here they are ready to be sent!  Oh how I still love those custom stamps.

DIY Calligraphy / Wedding Envelopes | Life's Tidbits

Good luck with your printing press!  If you have any questions about the process, please leave a comment … I’m happy to provide additional details!!

Happy Planning and DIY!!

signiture_nicole


Share

My friend at work has been doing this slow carb / four hour body diet.  Now I am not going to speak to the diet, however I did decide to try a couple of the recipes from the PDF she sent me!  My favorites are the meatballs and the creamy chicken tortilla soup!!!  I’ve made a couple of minor changes to the soup, however the recipe is based on the Four Hour Body diet recipe.

INGREDIENTS:

  • 6 cups of chicken broth
  • 1 can of refried beans (fat free)
  • 1 can of Rotel tomatoes
  • 1 can of Fire Roasted tomatoes
  • 1 can of black beans
  • 1 can of Mexican or southwest corn (drained)
  • 1 tsp hot sauce (omit if you don’t like any kick to your soup)
  • Cajun seasoning (to taste)
  • 1 rotisserie chicken chopped up, skin removed and bones removed

Recipe: Creamy Chicken Tortilla Soup | Life's Tidbits

Recipe: Creamy Chicken Tortilla Soup | Life's Tidbits

I doubled the recipe so yours won’t look like as much in a big pot.  The chickens were on sale for $3 … yes $3 crazy, right?  So I just couldn’t resist buying two.  Also this soup tastes fabulous if you freeze it and then let it defrost on your desk at work in the morning.  Who doesn’t like easy lunches?? Okay onto the cooking portion of this blog.

Bring the chicken broth to a boil and whisk with refried beans.  Add all the ingredients (except the chicken) and stir together.

Recipe: Creamy Chicken Tortilla Soup | 4 Hour Body | Healthy and Easy Dinner | Life's Tidbits

Make sure the chicken is broken into bite size pieces. It makes the soup easier to eat.  Then add to the pot.

Heat thoroughly on stove for at least 5-10 minutes, which also allows the flavors to develop.

Recipe: Creamy Chicken Tortilla Soup | 4 Hour Body | Healthy and Easy Dinner | Life's Tidbits

It will make 6-8 servings or 12-16 if you double the recipe like me.  Serve immediately or put in containers to freeze!!

Recipe: Creamy Chicken Tortilla Soup | 4 Hour Body | Healthy and Easy Dinner | Life's Tidbits

It is super yummy!  The husband and I are big fans and it is very much a recipe made weekly at our house as of late.

Happy Cooking!

If you enjoyed this post, please add your tidbit by commenting below.  Don’t forget you can follow us on PinterestInstagramFacebook and Twitter.

Share

I planned a small/intimate surprise birthday party for my husband turning 30.  And let me tell you he was SHOCKED when he walked in the front door.  I decided early on that I wanted the party to be beer themed, which clearly meant the cake needed to go with the theme.  I was very inspired by a bottle cap cake I found on a blog.

Unfortunately when it came time to making the cake I didn’t have enough time to make fondant.  So I went with option B.  Swiching from a cake to cupcakes. I mean cupcakes are in anyways so win!  Then I made made little bottle cap decorations for each of the cupcakes.  They are super easy to make.  AND how cute are these???

What you need:

Toothpicks
Glue
Beer Bottle Caps

Place a small dot of your duco cement in the center of the bottle cap. Let it dry for 30 seconds or so.

Place the toothpick at an angle into the glue dot.  Roll the toothpicks in the glue a little.  Then hold it in place. Unlike my husband try to put the toothpick at an angle and against the bottle cap edge.

Instead of holding the toothpick while it drys, which takes FOREVER there’s a better option! This took me a while to figure out, but in the end it was a life saver.  Put a second bottle cap on top of the bottle cap/toothpick like so …

Let dry for at least 15 minutes.  The longer the better and depending on the glue you use they will dry at slower or faster rate than mine did.  Then stick it into the cupcake and away you go.  I think it would have been nice to have a few more different types of beer bottle caps, but over all I am very pleased with how they turned out!  Check out the little display:

The color theme of the surprise party was yellow and chocolate brown.  The cupcake liners had yellow stripes on them.  You can find them here and they are pretty cheap and come in a lot of different colors.

Remember how much I wanted to use barbershop straws again? I got them for the surprise party!!  The other small decoration included brown and yellow balloons.

Oh and one more fun little detail for the party … custom napkins!  I had wanted to do custom napkins for our wedding, but it didn’t work out. I would never plan another party without custom napkins.  I love how they turned out!!

Surprise parties are so much fun and all the little tidbits and extra details all the difference in making the party look so cute.  :)

Happy DIY and party planning!

Don’t forget to leave your tidbit by commenting below :)

Share

Shortly after getting engaged and reading (too) many wedding blogs I became obsessed with having a Candy Bar/Buffet at our wedding.  Here are two candy buffets that were part of my inspiration:

Wedding Candy Buffet

Found on WeddingBee

Wedding Candy Buffet

Found on Aisle with Style by the Photo is from Hostess Blog.

Best place to buy anthropology jars that I found was Marshall’s.  All the good jars were about $12, which isn’t too crazy.  We went to multiple Marshall’s and waited a couple of months and then went again.  It took a while to compile all the jars, but in the end all the trips were totally worth it.

Other places I found candy jars were Michael’s, Crate and Barrel, Ebay and Craigslist.  9 time out of 10 though Marshall’s had the cheapest and best options.  I would definitely suggest doing some window/online shopping before buying from anywhere.

About 6 weeks before the wedding we purchased all the candy.  That’s not to say I had already picked out the candy months before purchasing it! :)  We went with purple, white and pink candy to go with the color theme of the wedding.  Well sort of, cause pink wasn’t a wedding color … but so many good candies are pink though!

We got the bulk of the candy from Candy Warehouse.  Here is exactly what I purchased:

  • White “Just Married” Sweet Tart Circle Rolls: 5LB Bag
  • Lavender Foiled Milk Chocolate Balls: 5LB Bag
  • Princess Candy Necklaces & Bracelets: 24CT Box x5 (this was too much probably only needed x3)
  • Strawberry & Creme Salt Water Taffy Candy: 3LB Bag x2
  • Green Rind Watermelon Slices: 5LB Bag
  • Haribo Gummi Pink Grapefruit Slices: 5LB Bag

The jelly beans were slightly cheaper at Bulk Candy Store.  Here’s what I ordered:

  • Island Punch Jelly Belly: 5 lbs
  • Coconut Jelly Belly: 5 lbs
  • French Vanilla Jelly Belly: 5 lbs
  • Strawberry Daiquiri Jelly Belly: 5 lbs
Here is the candy buffet all set up at the house two days before the wedding –

Wedding Candy Buffet | Life's Tidbits

A few small tidbits to consider:

  1. I had ~100 people at the wedding and this was too much candy for the size of our wedding.
  2. If we had provided the “to go” candy boxes at the tables people who missed the candy bar/buffet might have gone to seek it out. This could have meant not so much extra candy after the wedding.
  3. Don’t open the candy until a day or two before the wedding/party as the candy could go stale.
  4. The hotel provided the scoops, which meant we didn’t have to buy any!
  5. Make sure you visit your own candy buffet! We were so busy talking and dancing I didn’t make it by the buffet and I wish I had.
  6. If you are going to make name tags for each type of candy do so ahead of time. I ran out of time the week before our wedding and that detail just didn’t make the cut.
Over all I loved how our candy buffet came out!
Wedding Candy Buffet | Life's Tidbits
Photo Credit: Wedding Guest

Wedding Candy Buffet / Candy Bar / Love it Sweet| Life's Tidbits

Photo Credit: Korie Lynn Photography

Wedding Candy Buffet | Life's Tidbits

Photo Credit: Korie Lynn Photography

I think the candy display was cute and came together how I had envisioned.  I sold all of the candy jars to a bride-to-be in the DC/VA/MD area. It felt so nice to see the HUGE smile on her face as she loaded them into her car … and how relieved she was the search for jars was over.

What extra tidbit would you have added to the candy bar/buffet?  Anyone have tips for other brides?

Happy Planning!

Signiture_Nicole


Don’t forget to leave your tidbit by commenting below :)

Related Posts Plugin for WordPress, Blogger...
Share