The title sounds worse than it is by A LOT, but I thought it accurately summed up the situation.  My husband will tell you I am one of those people who loves something in the store (or online) and then immediately second guesses my choices once the item is purchased and home.  For example when we got our dining room table chairs I obsessed about if the cream went okay with the beige/darker cream couches we have. I think it took a good two weeks for the buyers remorse to dissipate.  I love the chairs and think they look great … so seriously what was up withe the buyers remorse?

If it happens with purchases like a pair of jean or a chair, then clearly the buyers remorse would kick in for a wedding dress, right?

I started watching “Say Yes to the Dress” before I got engaged and once we were engaged I thought heck I will try on 5 or 10 dresses and find the one I want quickly.  Unfortunately I wasn’t a 5-10 dress kind of bride. I think I was probably more in the 30-40 range.  I would chalk a lot of that up to trying on almost any dress suggested so I could narrow down what it was I really wanted.

I tried on a lot of dresses before deciding on THE dress. The day I found my wedding dress I was with my MOH and one bridesmaid.  And just to make things interesting the dress I decided was THE ONE happen to be part of a trunk sale.  This dress was only going to be in the store for that weekend and then it would be packed up and sent to another bridal shop.  There was no way I was going to buy a wedding dress without my mother seeing it. The owner of the store suggested we skype with her, however while having lunch, my sister and I decided my mother should fly from Boston to DC just for the day.

Oh yes I am that crazy and thought it was TOTALLY appropriate to have my mother fly in Sunday morning and out that evening just to see the dress.  After some serious convincing my mother agreed to fly in for the day.  We found a “reasonably” priced ticket and the next day she arrived bright and early to do some dress shopping.  Smartly, she requested that we go to at least one other store so she could have other dresses to compare THE dress too.

We began at Hannelore’s and I tried on two dresses for her.  The first and the immediate favorite at that store looked like this:
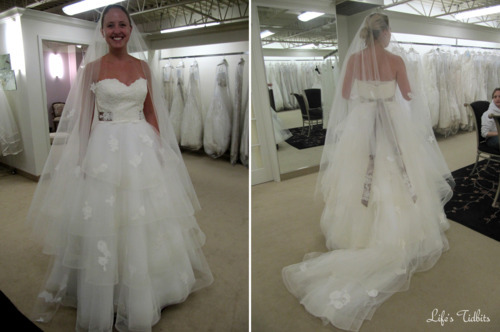
Anne Barge, Style 612

The second, which I had liked the first time, but not loved got cut almost immediately. We quickly realized in pictures you couldn’t see the beautiful lace in the boddus.  It just didn’t “pop” to us.  Here’s the second dress:
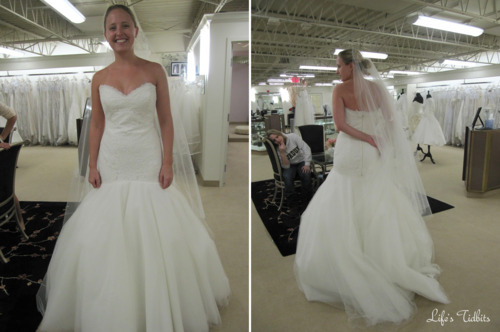
Romona Keveza Legends 804 – Look at my sister in the background … how bored does she look. hahahahaha. It was because she knew it wasn’t the right dress!

After taking my measurements for the first dress and pretty much talking myself out of the dress my mother had initially flown in to see we headed to Love Couture.

They already had “the” dress as well as one other I had been considering ready for us.  I slipped into the dress and was grinning ear to ear.  As my sister had predicted while we were in Hannelore the Stephen Yearik dress was a better match for the look I was going for.  Here we are trying on the dress at the store:
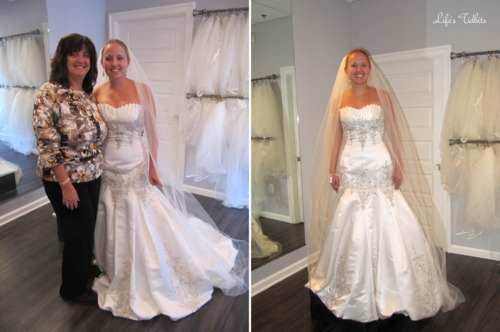
Stephen Yearick

Two days later the buyers remorse kicked into high gear. I started pulling up the two dresses and comparing/contrasting them. My sister, the MOH, kept telling me I was crazy for doubting my initial decision. I waffled back and forth for the next few months. I started checking out second hand versions of the Anne Barge dress and seeing if I could afford (heck no!!) the second dress I liked as well.

In the end all the buyers remorse was erased when I went to the store to try my dress on the day it came in!  After the alterations, makeup, jewlery and all the other good bridal stuff here’s how it looked on our wedding day:
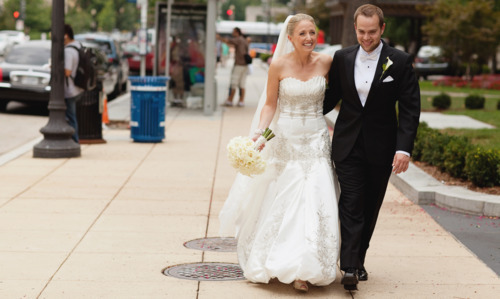
Photo Credit: Korie Lynn Photography

Thanks for taking a walk down memory lane with me.  Buyers remorse be gone because on the day of our wedding I wouldn’t have wanted to be in any other dress!

Happy Dress Shopping!

Don’t forget to leave your tidbit by commenting below :)

Share

Big, BIG things happening for us as of late.  Apparently we don’t know how to do low key/boring. :)

2010 – Engagement
2011 – Wedding/Honeymoon
2012 – PURCHASE OUR FIRST HOME!!!!!!!!!!
2013 – ??? I’m sure we will find something to spice things up next year!

Remember back in February when we turned 30 and went on our lovely trip to Mexico? Well the day before we left for vacation we found out the owner of the condo we rent is planning to sell.  What did this mean for us? Well it meant we had to move and do it within the next few months.  STRESSFUL! The thought that we would need to move, or that our apartment would be sold, was nowhere on our radar.

We had planned on building up our saving account a little more and then purchasing our first home.  The plan was to move at the end of the summer (or possibly early 2013).  With the news of an impending sale coming our way, the purchasing timeline was moved up.  Our move out date was no longer being driven by our savings account but by our current landlord’s desire to sell.

Despite our initial freakout everything has worked out pretty well.  We have a friend who’s a realtor so we called him the day we found out about needing to move and he got us hooked up with the lender that afternoon.  Within a week of coming back from vacation we were preapproved for a place and ready to start the big search.

While we were drinking margaritas and relaxing on the beach the husband and I came up with our must have and like to have lists for our first home.

Here is what our list looked like in order of priority …

Must Haves:

  1. Within our ideal price range
  2. In DC (not Maryland or Virginia)
  3. Pet Friendly – we can’t part with little Miss. Sophi!
  4. 2 bedrooms
  5. Washer/Dryer
  6. Walking distance to a metro

Like to Haves:

  1. Parking Space
  2. Plenty of Storage
  3. 1.5 or 2 bathrooms
  4. Patio and/or balcony
  5. Fireplace

I felt like this was a pretty good list to begin with and began stalking RedFin for listings. After looking at a few condos in person, our must have list started to change a little.  We quickly realized a large living/dining area was important to us.  Small bedrooms were okay as long as the living space was big.  I feel like I do two to three things in the bedroom.  Sleep, get dressed and watch tv. I don’t need a massive amount of space for any of those.  Also, it became very clear places under ~800 sq feet were just too small.  As it turns out the one bedroom we rent is slightly over ~800 square feet so when you add a second bedroom but don’t increase the size of the unit the living space shrinks considerably.  TIP: find out the square footage of your current place before you start looking at places (to rent or buy).  This  will help you to gauge what square footage is ideal for you.

After viewing at least 20+ places in person and probably over 100 online we ended up putting an offer in and after a week of negotiations the place was officially UNDER CONTRACT.  WOOT WOO!!!

Based on our initial list we end up with the following:

Must Haves:

  1. Within our ideal price range – FAIL we went over the initial budget
  2. In DC (not Maryland or Virginia) – CHECK
  3. Pet Friendly – CHECK
  4. 2 bedrooms – CHECK
  5. Washer/Dryer – CHECK
  6. Walking distance to a metro – CHECK

Like to Haves:

  1. Parking Space – Fail
  2. Plenty of Storage – Fail … well kind of.
  3. 1.5 or 2 bathrooms – CHECK
  4. Patio and/or balcony – CHECK
  5. Fireplace – Fail

PLUS our living/dining room is HUGE and get a ton of natural light, win win!!  Overall I would say we made out VERY well with our first homeowner purchase.

Looking back at the process here are a few things I think we did right and a few more I wish we had done:

  • Go with your gut. If you love it then you love it and if you don’t there are always more places coming onto the market so don’t settle.  For those of you who purchased a wedding dress and had “this is THE dress” moment that will happen for your home too!
  • View a lot of places and even take a look at places you aren’t sure look great online. Not all places photograph well (or the owner just puts up crappy pictures).  We found a few I wasn’t sure about online and then really liked in person.
  • Remember the paint color (or wallpaper) can always be changed!
  • Determine what the deal breakers are. For example I hated when the second bedroom didn’t have a window (which didn’t come to light until we saw a few places like this).  It didn’t bother my husband, but we agreed when things are a deal breaker for one of us then the place is out.
  • Figuring out what you can afford and comfortable spending BEFORE you start looking and don’t look out places above your price range.  I mean let’s be honest if you find a place for 100k that you like, but then look at a place for 500k 9 times out of 10 you are going to like the more expensive place.  Just don’t tease yourself it isn’t worth it I promise (same thing goes for wedding dress brides!!!).
  • Going back to the first choice place at least once before putting in an offer or shortly there after. It felt so good to walk into the condo and confirm I LOVED it.
  • Getting the paperwork in order while looking for a place. I wish I had asked the Lender for a list of the paperwork we were going to need to provide (bank statements, w-2s, paychecks, etc) to get fully approved.  The documents takes a while to compile and if you are like me, you might have forgotten how to access some of your 401k accounts online.
  • Don’t take the negotiations personally.  The seller wants the highest price possible and you want the lowest.  Some back and forth is to be expected.  We had a hard time with this because we felt our initial offer was very reasonable/fair.

And remember to RELAX and try to ENJOY purchasing your first home!!

Related blogs coming up soon: Moving, painting and other homeownership related projects.

What tips do you have for a first time home buyer?  Do you have any pre-move in tips for us?

Don’t forget to leave your tidbit by commenting below :)
Share

That was the BIG questions!

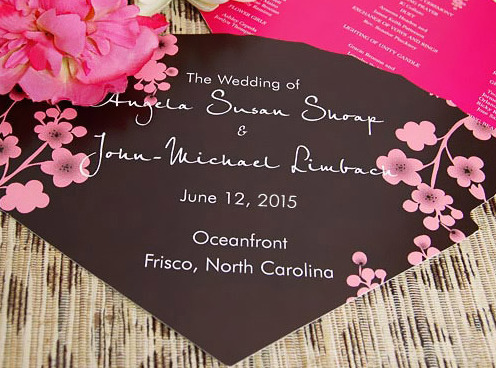
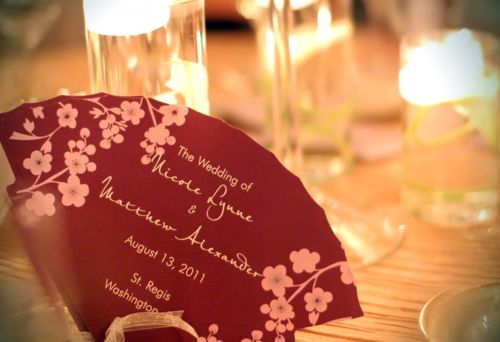
I became slightly obsessed with the whole DIY thing for the wedding and wanted to make my own wedding programs.  And not any programs, but FAN programs that looked like so:

Photo from http://cherishpaperie.com/faq/programs

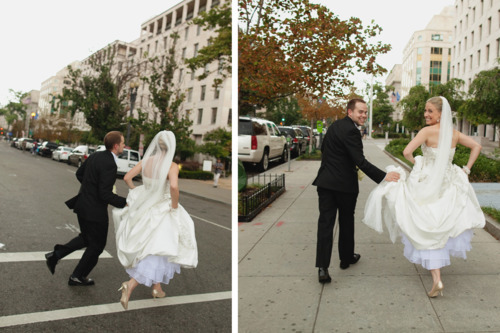
I honestly thought getting married in August with a courtyard ceremony meant everyone would be sweating to death while we walked down the aisle and said our vows.  Little did I know it would torrential down pour that day and the beautiful courtyard ceremony I had pictured in my head would never happen.  Oh poor me … I mean getting married in a beautiful hotel really is the pits, isn’t it?!?! wink wink!  Here we are running from the white house back to the hotel as the rain clouds took over the sky.  So glad we got a few pics at the white house in between the rain!!

Photo Credit: Korie Lynn Photography

Okay so enough about my non-courtyard ceremony and back to the wedding programs.  My mother was a bigger fan of these fan programs because of the embossing:

Photo from fan-wedding-programs.com

We honestly went back and forth SO many times about what the programs should look like.  My husband pretty much drew the line at another DIY project.  He thought making our wedding invitations was enough.  Not to mention the DIY escort cards, rehearsal dinner invites and menu cards.  With another DIY project out the husband said whatever made me happy would make him happy for the programs.  My mother and I went back and forth a number of times.

It soon came to the point where no matter where I ordered the wedding programs from I was going to have to pay for rushed shipping.  Most of them were set to arrive with standard shipping the Friday before our wedding.  Clearly that was just WAY too close to the wedding to chance it.  I finally found these:

Photo from beau-coup

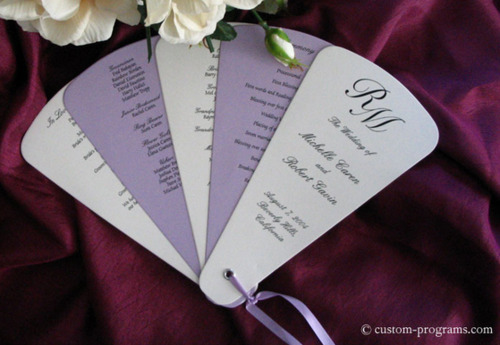
The husband was on board, so was my mom and the MOH (my sister)! Win, win, win!! With everyone in agreements I ordered the programs immediately.  Luckily it arrived without any incorrect spelling!!  I’m not going to lie the purple color wasn’t exactly what I had envisioned, but I still loved how they came out.

Photo Credit: Sara without an H

The programs came with little holes in the bottom.  I purchases sparkly white ribbon (from Michael’s) to put through the hole.  My mom and dad spent a couple hours cutting the ribbon to size and putting them on the programs the Friday before the wedding.  Nothing like me waiting until the last minute! :)

So my advice to you – please order wedding programs at least a month or two before the wedding.  AND know your limits. DIY is awesome and all, however if you don’t your limit you will over extend yourself (and loved ones) instead of enjoying the projects they will end up stress you out.  I’m glad my husband knew where the line was for me. =)

Happy wedding planning!

Don’t forget to leave your tidbit by commenting below :)
Share

I planned a small/intimate surprise birthday party for my husband turning 30.  And let me tell you he was SHOCKED when he walked in the front door.  I decided early on that I wanted the party to be beer themed, which clearly meant the cake needed to go with the theme.  I was very inspired by a bottle cap cake I found on a blog.

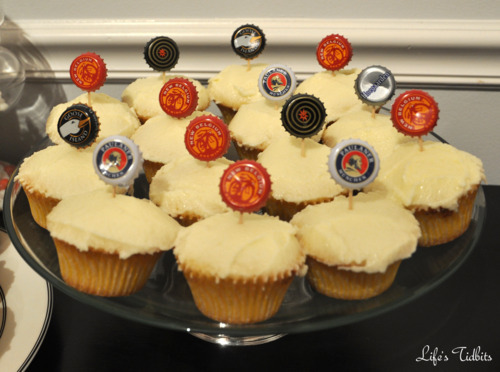
Unfortunately when it came time to making the cake I didn’t have enough time to make fondant.  So I went with option B.  Swiching from a cake to cupcakes. I mean cupcakes are in anyways so win!  Then I made made little bottle cap decorations for each of the cupcakes.  They are super easy to make.  AND how cute are these???

What you need:

Toothpicks
Glue
Beer Bottle Caps

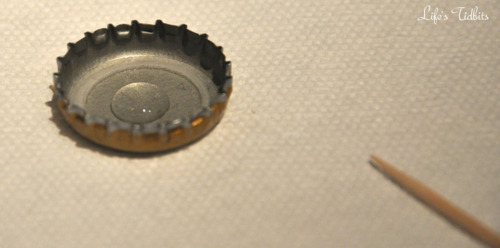
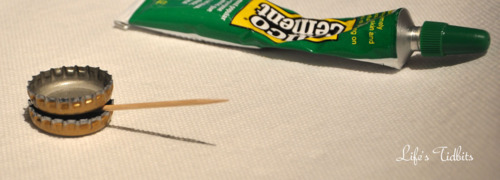
Place a small dot of your duco cement in the center of the bottle cap. Let it dry for 30 seconds or so.

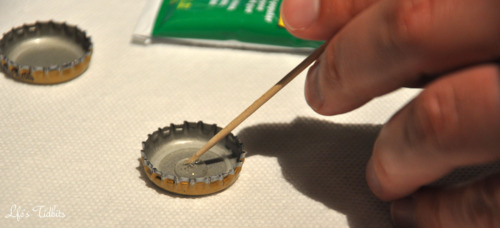
Place the toothpick at an angle into the glue dot.  Roll the toothpicks in the glue a little.  Then hold it in place. Unlike my husband try to put the toothpick at an angle and against the bottle cap edge.

Instead of holding the toothpick while it drys, which takes FOREVER there’s a better option! This took me a while to figure out, but in the end it was a life saver.  Put a second bottle cap on top of the bottle cap/toothpick like so …

Let dry for at least 15 minutes.  The longer the better and depending on the glue you use they will dry at slower or faster rate than mine did.  Then stick it into the cupcake and away you go.  I think it would have been nice to have a few more different types of beer bottle caps, but over all I am very pleased with how they turned out!  Check out the little display:

The color theme of the surprise party was yellow and chocolate brown.  The cupcake liners had yellow stripes on them.  You can find them here and they are pretty cheap and come in a lot of different colors.

Remember how much I wanted to use barbershop straws again? I got them for the surprise party!!  The other small decoration included brown and yellow balloons.

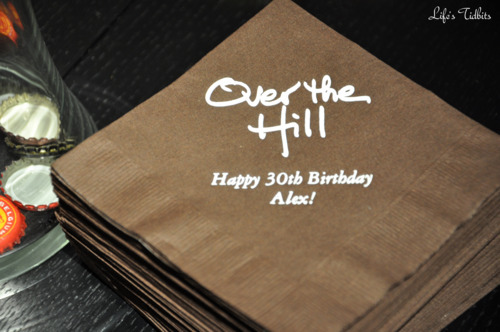
Oh and one more fun little detail for the party … custom napkins!  I had wanted to do custom napkins for our wedding, but it didn’t work out. I would never plan another party without custom napkins.  I love how they turned out!!

Surprise parties are so much fun and all the little tidbits and extra details all the difference in making the party look so cute.  :)

Happy DIY and party planning!

Don’t forget to leave your tidbit by commenting below :)

Share

We got engaged in October and by the time we found our photographer, signed the contract and thought about scheduling our e-session it was FRRRREEZING outside.  After giving it some thought we decided to wait until April to do our engagement photos.

A larger number of people use their e-pics on their save the dates (STDs).  Since our save the dates went out priority to even booking the photographer we were going to have to find other ways to use the pictures.  When we received our ~120 engagement photos I started wondering what we were going to do with all these pictures.

We did the typical print a few and put them up around the house as well as place a few favorites on the wedding website.  But it just didn’t feel like enough and I started to think there just HAD to be more we could do with all these cutsie pictures.

I found five fun ways to take advantage our engagement pictures!

All of the engagement photos were taken by Korie Lynn Photography

1.  Guest Book

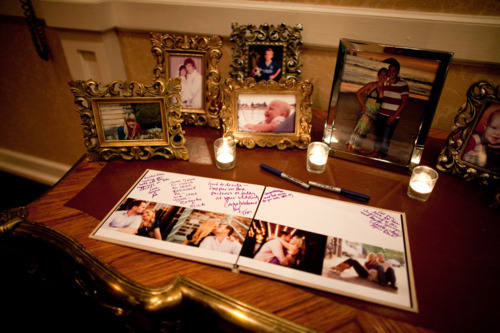
Part of our photography package included a guest book.  The hubby and I chose our favorite pictures and then our photographer designed and printed the book for us.  If it isn’t included in your photo package it’s a super easy DIY project.  Photobooks can be created on Shutterfly, MyPublisher, SnapFish, Blur and the list of places goes on and on.

Check out our book:

Photo Credit: Korie Lynn Photography

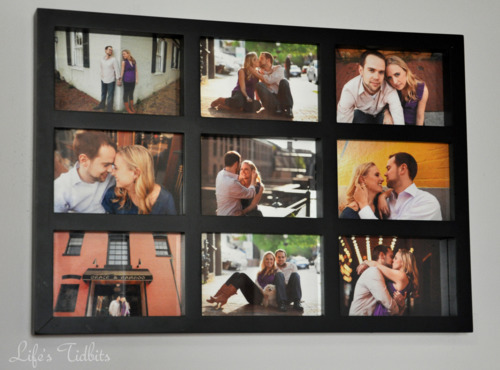
2.  Framed Collage

We had a frame with pictures we weren’t loving anymore.  We printed our top 9 photos and voila …

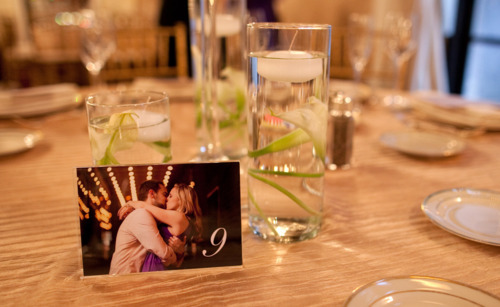
3.  Table numbers!

I had serious issues trying to decide what to do about table numbers.  I thought about naming each table a Washington Monument, wine bottles, luminaria with numbers and gosh probably a dozen other things.

In the end we picked our favorite engagement pictures added numbers with Photoshop … printed the pictures and purchased some plastic picture frames.  It was a super easy DIY and pretty cheap too if you ask me.

Looks pretty … right?!

Photo Credit: Korie Lynn Photography

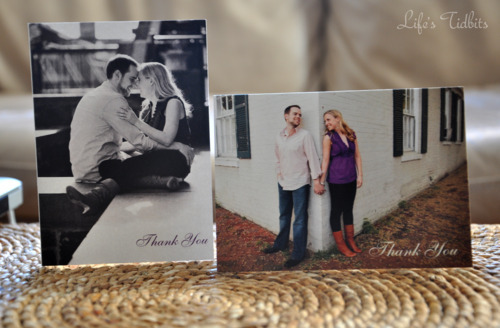
4.  Thank you cards

These were a HUGE hit with our friends and family.  We chose two different pictures and used Photoshop to add “Thank you” to the images.  I ordered them from Shutterfly, however like the guest book there are a ton of places you can order customized photo thank you cards.

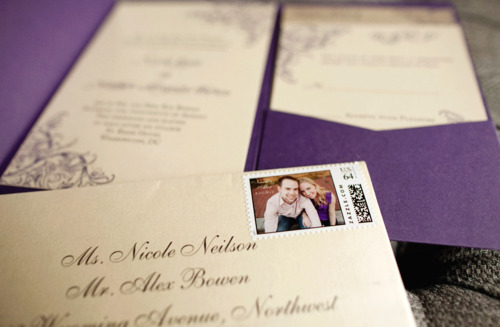
5.  Custom Stamps for the wedding invitation

I wish I could take all the credit for this idea, but my mom really pushed me to follow through on this idea.  I had toyed with buying custom stamps for the invitations, however I wasn’t sure if it was worth the extra money.  In the end I decided it would be fun and I ordered the custom stamps from Zazzle.com.  The stamps come in three different sizes so you have your choice of how big you want the stamp to be.

Tip: Make sure to take the invitation to the post office prior to buying the custom stamps so you know what postage rate you will need to purchase.

Photo Credit: Korie Lynn Photography

So there are my engagement picture tidbits.  How have you (or your friends) used engagement pictures?

Happy Planning and DIY!

Related Posts Plugin for WordPress, Blogger...
Share