While doing “married things” {phrase coined by the husband} we ended up at The Container Store.  Clearly this is one of those places like Target or Bed Bath and Beyond, where I find things I never knew I needed but while we are there I think I really do NEED them.  I mean there is no reason we should have spent 1+ hours at The Container Store when it was sunny and 80 plus degrees outside.  But anyways, while walking up and down each aisle we ended up with quite the large cart of stuff we “needed”.

One of the many items in our cart was elfa kitchen storage.  Our condo is the first place I’ve lived where I haven’t had to use cabinets to store food.  The pantry is great and has really come in handy for storing items not eatable as well like batteries, lunch boxes, cook books and dish towels.  As a result our pantry has been pretty much over full since moving in.  We were hoping the elfa storage would expand the pantry a little bit.

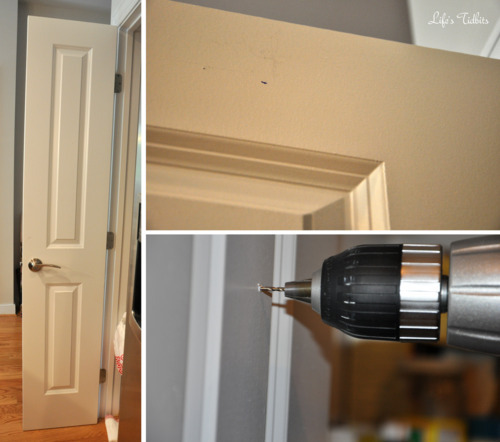
Installation was very easy.  Hold the long rod up to the back of the door and mark the places where the screws go.  We went ahead and drilled the holes a little to get it started and make the screw go in easier.

We held up the rod and put two screws into the door to hold the rod in place.  Before fulling anchoring it to the door we ensured it was level.  It was so we put all the screws securely into the door, clipped on the baskets and we were done.  The great part about the baskets are they come in standard and narrow.  We purchased the narrow baskets to ensure they wouldn’t hit the shelving in the pantry.

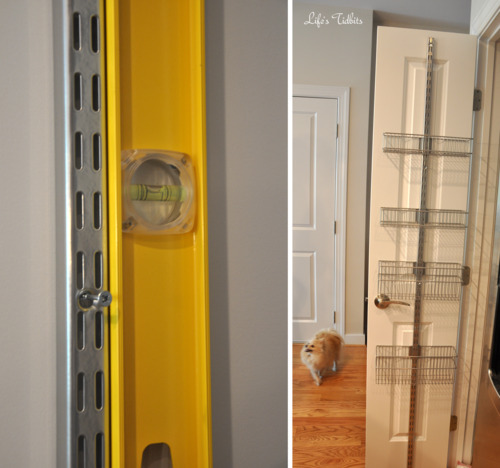
Initially we purchased 4 baskets.  We were pleased to see there was plenty of room for 2-3 more baskets.  Back to the container store we went and purchased two additional baskets.  We are loving the new storage and the way the baskets help with organization!!

What do you think of our new expanded pantry?

Happy home improvements!

Don’t forget to leave your tidbit by commenting and/or add Life’s Tidbits to your RSS Reader :)

Share

Previously on our honeymoon series: Positano, Sorrento and Cinque Terre. Now that you are all caught up let’s talk ROME!

After another extremely long train ride we arrived in Rome!  I feel like our last stop was the most cultural.  Rome was a great way to spend our last few days in Italy and on our honeymoon.  We stayed in downtown Rome and within walking distance of the at the Artemide Hotel.  On the evening we arrived we were starving after checking into the hotel.  We walked down the street to a local bar.  We had a little food as well as a drink and just people watched for a while.

Heading to Rome? Here is a sample itinerary for what to do if you have a few days in Rome, Italy. Honeymoon travel guide

Day 10: Colosseum, Palatine Hill and Roman Forum

After breakfast, at the hotel, we headed to the Colosseum.  We packed plenty of water and suntan lotion into our backpack as well as the camera.  Rome in mid-August is HOT HOT HOT!  The ticket line at the Colosseum was super long.

In order to skip the line we decided to join a tour.  This was a bad idea.  Although they got us into the Colosseum rather quickly, the tour really didn’t provide any substantial information.  The time spent within the Colosseum was very limited before they tried rushing us off to the next two locations – Palatine Hill and the Roman Forum.

There was no reentry to the Colosseum and we weren’t done exploring so we opted to stay behind and really soak it all in.  The tour guide didn’t give us our tickets so we wouldn’t be able to get into Palatine Hill without being with the group.  Saying behind meant we would need to purchase tickets again to gain entrance to the other sites.  Tourist fail and we absolutely felt like we had been scammed, but it was the only issue we encountered the entire time we were in Italy.  Lesson learned!

After walking around the Colosseum we headed over to the  Palatine Hill and the Roman Forum.  The line was SO short.  After getting our fill of tourist stuff we headed back to the hotel to relax and get ready for dinner.

TIP – Go to Palatine Hill and buy tickets there for the Colosseum.  The lines at Palatine Hill/Forum are SO much shorter the Colosseum.

RomeItaly-1

RomeItaly-2

RomeItaly-3

RomeItaly-4

RomeItaly-5

RomeItaly-6

Restaurant Romantico came highly recommended so we made a reservation through Facebook.  The ambience and food did NOT disappoint!  The restaurant was quaint and very romantic … perfect for a honeymoon.

Restaurant Romantico Rome, Italy

Restaurant Romantico Rome, Italy

Day 11:  Capital Hill, Pantheon, Spanish Steps and Trevi Fountain

We had trouble deciding what to do on our last day.  Torn between the Vatican and a self guided tour around Rome to see a bunch of sites.  In the end a self guided walking tour won out.  Although we really wanted to see the Vatican we also weren’t excited about missing all the other great sites around the city.  Our guided tour went like this:  Capital Hill, Pantheon,  lunch at Life Pizzeria, Spanish Steps to the Trevi Fountain.

Things to do in Rome

Our last dinner in Rome was at La Pentolaccia.  The owner of the restaurant suggested a fabulous bottle of wine and helped us choose great meals.  After dinner he suggested we get have some of their homemade limoncello.  It was delicious and the meal was a great bookend to our honeymoon!

La Pentolaccia Restaurant in Rome, Italy

Side Note:  The wine in this picture is actually sold at Costco in VA!  When I told the husband I found a wine from our honeymoon at Costco he didn’t believe me.  Luckily I took a picture of the bottle and was able to PROVE to him it was in fact a “honeymoon” wine. :)  Every time we buy the wine we reminisce a little about our trip.

Day 12: Heading Home

We took an EARLY cab ride to the airport and checked our flight back to the states.  Does anyone remember that crazy hurricane from last summer?  Well we do!  When we arrived at the airport a number of flights to New York and New Jersey were already cancelled.  We were fortunate and our flight from Rome to Boston to DC was still on schedule.

Apparently when we were already inflight to Boston our connecting flight to DC was cancelled.  This was actually not a big deal since my parents live in MA so we had a place to stay.  PLUS they had been watching Sophi so we got to be with our puppy too!  After a couple nights with my parents and sister we flew back to DC with the dog and started our life in DC as husband and wife!

Have you been to Rome?  What was your favorite restaurant or thing to do?

Don’t forget to leave your tidbit by commenting below :)

Share

I have always loved me some chocolate. Make that a molten lava cake a la mode and I’m ALL IN!  As someone with a serious sweet tooth I often make restaurant choices based on their dessert menu.  On weekends when I was home from college my mom would ask me where I wanted to go to dinner. I would almost always opt for The Lyceum (which apparently is now closed – just found that out when Googling it).  Anyways, I found Paul Deen’s recipe for Molten Lava Cakes and decided to give it a whirl.  Let me just say it is YUMMMMMOOOO! I could eat it everyday, but everything in moderation, right?!

Ingredients:
6 (1-ounce) squares bittersweet chocolate
2 (1-ounce) squares semisweet chocolate
10 tablespoons (1 1/4 stick) butter
1/2 cup all-purpose flour
1 1/2 cups confectioners’ sugar
3 large eggs
3 egg yolks
1 teaspoon vanilla extract

Directions:
Preheat oven to 425 degrees F and grease 6 (6-ounce) custard cups.  Melt the chocolates and butter in the microwave, or in a double boiler.  A double boiler is simply steaming water that doesn’t touch the glass bowl above it.

Combine the flour and sugar in a bowl and the eggs/yolks in another bowl.

Add the flour/sugar mixture to the melted chocolate/butter.

Stir in the eggs and yolks until smooth. Stir in the vanilla.  Divide the batter evenly among the custard cups.

Place in the oven and bake for 15-18 minutes. The edges should be firm but the center will be soft and a little runny.  If you plan to save a few lava cakes for another night like we did, I would suggest slightly under cooking them say 12ish minutes.  That way when you reheat them you won’t cook the center through.

Run a knife around the edges to loosen and invert onto dessert plates.  Add a scoop or TWO of vanilla ice cream to make lava cake a la mode!  Serve and enjoy. Super yummy!!!

Happy cooking!!

Don’t forget to leave your tidbit by commenting and/or add Life’s Tidbits to your RSS Reader :)

Share

I really like watching the Food Network cooking shows.  One of the chefs I really like is Anne Burrell.  She make some great recipes, but also I just love her level on energy on the show.  In any event, a while a go I watched the show where she makes garlic chicken with Israeli couscous.  Last night I was craving Israeli couscous so I looked up Chef Burrell’s recipe for inspiration.  Israeli couscous is more fluffy and pasta like than “regular” couscous.  If you’ve never had it before it’s definitely worth a try.

After figuring out what I had in the house I decided to make a simpler version of the recipe while trying to get the same type of flavors in my chicken breasts.  I am happy with how it came out and will be adding this recipe to the dinner rotation.

Garlic Chicken Ingredients:

~ 1 lb Chicken Breasts
1 whole garlic bulb
1/2 lemon, zested and juiced
1/4 tsp thyme
1/2 tsp ground cumin seeds
Pinch crushed red pepper flakes
Kosher salt
Extra-virgin olive oil

Preheat the oven to 350 degrees F. Put the garlic bulb straight on the oven rack and roast it is soft when squeezed, about 30 minutes. Remove them from the oven and let cool.

While garlic is roasting, prep the chicken by removing any fat and cutting into large chunks (about 6).

In a bowl combine the lemon zest, juice, thyme, cumin, red pepper flakes and salt then set aside.

When the garlic bulbs are cool, slice the tops off.

Squeeze out the roasted garlic into the bowl.  Add a little olive oil and mash the mixture into a loose paste. Combine with the chicken pieces and let sit for at least 1 hour.

Once the chicken has marinated grill, bake or stove top cook it.

Couscous Ingredients: 

1 cup of Israeli Couscous
1 and 1/4 cups of Chicken Broth
2 Scallions/Green Onions

Bring a chicken broth to a boil over.  Add the couscous, reduce to a simmer and cover for about 8-10 minutes.  watch the couscous closely as sometimes the water boils out too quickly.  You can also completely shut the heat off and cover it.

Cut all of the green onion into thin slices.  Once the couscous is cooked mix in the green onions.

I like to serve it in shallow bowl. Add the couscous/onion mixture and then place the cooked chicken on top.  This recipe makes 3-4 servings.

Looks so pretty and it’s yummy too!

Happy Cooking!

Don’t forget to leave your tidbit by commenting and/or add Life’s Tidbits to your RSS Reader :)

Share

I don’t know why, but back in February I became slightly obsessed with making red velvet cupcakes.  I wanted to make them for my 30th birthday, however my husband told me cooking for my own birthday celebration was a no-no! :)  Little did I know he had already purchased my favorite cake vanilla on vanilla.  Plain Jane over here, but I do spice things up from time to time.

I’ve heard a ton of stories about red velvet cupcakes ending up too dry so I was weary of picking a recipe to follow.  I ended up referencing the follow recipes which can be found here (primarily used), here and here.

For my first try at these somewhat finicky cupcakes they turned out great! My husband tried the batter and loved it. Then talked about how great the house smelt the whole time they cooked.  He’s my designated frosting checker and gave the A-OK on that little number as well.  In the end the final cream cheese frosting on a red velvet cupcake was a success in our house tonight!

What you will need for the cupcakes:

  • 1 cup (2 sticks) unsalted butter, softened
  • 1 1/2 cups sugar
  • 2 eggs
  • 1/4 cup (2 oz) red food coloring
  • 1/4 cup unsweetened cocoa powder
  • 2 1/2 cups all-purpose flour
  • 1 tsp salt
  • 1 tsp baking soda
  • 2 tsp vanilla
  • 1 cup buttermilk
  • 1/2 cup sour cream
  • 1 Tbsp white vinegar

NOTE:  3 tbsp of coco powder is equal to about 1/4 cup – in case you are referencing other recipes like I did.

Preheat oven to 350. Line muffin tin with baking liners.

Cream butter and sugar on medium-high for two minutes. Mix in one egg at a time, beating after each addition.

Combine food coloring and cocoa powder to bowl. Watch out for your clothes! I got food coloring all over one of my favorite shirts … pout!  Turn the mixer to low and add to the butter/sugar/egg mixture until just incorporated and then beat on medium for 4 minutes.

Sift together the flours, salt, and baking soda and set aside. Stir buttermilk and vanilla together.

Add dry ingredients to the bowl in three batches, alternately with the buttermilk in two batches, starting and ending with the dry ingredients. Beat on medium until just combined.

Add sour cream and vinegar and beat on low until combined.

Fill muffin cups 3/4 full and bake for 20-30 minutes.  Check the cupcakes at about 15 minutes with a toothpick to see how they are coming along.  Let cool on a wire rack or in the pan.

While the cupcakes are cooking or cooling make your frosting.

What’s needed for the frosting:

  • 16 oz cream cheese, softened
  • 10 Tbsp butter, softened
  • 2 tsp vanilla
  • 3 cups powdered sugar, sifted

Combine the cream cream cheese, butter, and vanilla in the mixer at med speed.  Add the powdered sugar to the bowl in small batches, while beating on low.  Be careful not to add too much or it was dust you and the counters with sugar as it combines. :) Once fully combined beat on high until desired consistency is reached.

For a stiffer icing, add more powdered sugar.  If needed add a little milk to make the icing softer (you shouldn’t need to do this).

Put your icing into an icing bag and cut off the tip of the bag.

Apply the icing in circles from the outside in.  You should have some frosting left over.  It’s a little too much frosting for 24 cupcakes.

Happy Cooking!

Do you have any tips on making red velvet cupcakes?

Don’t forget to leave your tidbit by commenting below :)

Related Posts Plugin for WordPress, Blogger...
Share