Centerpieces and/or flower arrangements can be quite costly this time of year.  With Thanksgiving over and Christmas right around the corner it seemed like the perfect time to share the DIY rose and cranberry center pieces we make every Thanksgiving.  My mom got the idea when walking through the flower section in Whole Foods a few years ago.  My mother use to be in charge of making the arrangements, but then my sister took over.  Check out our pretty Thanksgiving table will all the yummy food!!

My sister was kind enough to let me document the process of the center piece creation this year.  So here we go!

What you need:

  • ~27 Yellow Roses
  • 6 bags of whole cranberries
  • 3 square vases
  • water

Place the cranberries in the square vases and add water (but not all the way to the top).

Remove the leaves from the rose stems and hold it up to the vase to determine how much stem to cut off.  Cut off the stem.

Push the rose into the vase between the cranberries.  Then rinse and repeat!!  Each vase will hold about 9 roses depending on the size of the vase.

After you’ve put in all the roses add additional cranberries and water as needed so they are almost to the very top of the vase.  In this end this is what you get.

As you can see we miss counted the yellow roses this year and had to through in a few red ones. I think it still looks pretty cute!

Happy Holidays and DIY!

Don’t forget to leave your tidbit by commenting and/or add Life’s Tidbits to your RSS Reader :)

Share

It’s almost time to call our wedding stuff a wrap, but before I do I MUST, must, must share with you my DC bridal shower.  My girls planned a lingerie bridal shower for me which was fabulous and the details were perfection.  The Newlywed Game was was pretty hilarious.   Before the bridal shower they asked my husband questions about the me and our relationship.  Then I was asked the same questions.  For each question I got wrong I had to chew a piece of bubble gum.

In the picture on the left we are all laughing and my sister is passing me some gum since I got a question wrong.  In the picture on the right I am clearly hesitant about the next question that will be asked.

Although I did pretty well I was definitely drooling because I was chewing so much bubble gum by the end of the game.  Do you see the tissue/napkin in my hand … yes I was starting to drool LOL.  That bubble gum is JUICY I tell you!  To go with the lingerie theme my cousin (who is insanely talented in the cake baking/designing department) made this beautiful cake:

I believe it is two sheet pan cakes – one for the base and one for the body – and the boobs were cupcakes.  I’ve been dying for a friend to have a lingerie themed bridal shower or bachelorette.  I would love to attempt to make this cake.  I found one blog that gave step by step instructions on how to make the cake, but it has recently been removed … POUT!  I should have copied the direction as soon as I found the blog – lesson learned.

And because one DIY baked good just wouldn’t do my sister and my mom’s friend made a second.  They made butt/lingerie cookies for all bridal shower guests.  Not only were the cookies yummy, they were so cute!  But these cookies are hard to transport.  The cookies pictured below were among the survivors from the 1.5 hour flight to DC from Boston.  Luckily they planned ahead and made extra in the event that some of the cookies broke during their travel time.  It’s strongly recommended you don’t travel too much with these little guys or they might get ruined.

So what did they need to make these cookies you might ask …

  1. Sugar Cookie Recipe
  2. Heart shaped cookie cutter
  3. White Frosting mixed with different food coloring
  4. Frosting bags and tips

I Facebooked my mom’s friend and she was kind enough to give me some tips on how to make these cookies come out right.   “I used a rolled sugar cookie dough.  Rolled it out and cut them into heart shapes. as soon as they came out of the oven, I cut off the tip end of the cookie, forming the butt part.  It was a lot of trial and error.  I tried doing that before I cooked them, but it didn’t work. they would swell and spread and not even look like a ‘fat butt’. ”  Thanks for the tips Kathy!!  Then the frosting bags were filled with tips and frosting.  From there you just decorate each individual cookie.

The husband showed up at the end of the shower to have dessert with me and all my lovely ladies.  My dad was there as well … don’t worry we wouldn’t leave him out.  :)  As folks were picking out their cookies and saying goodbye I snapped this fun picture of my little sister and husband.  I LOVE the picture and THEM!!!

The shower was SO much fun!  Do you like the cake and butt cookies?  I know I do!!!

Don’t forget to leave your tidbit by commenting and/or add Life’s Tidbits to your RSS Reader :)

Share

And I mean that literally … the wheel on the bus (read party bus) went POP.  So which (party) bus, how, when and what exactly happened is the “not so funny then”, but “kind of funny now” type of story.  Last summer my amazing maid of honor and bridesmaids planned a super fun bachelorette weekend for me and our friends!!  It was weekend packed of fun activities in the DC area.

The weekend started with a roof deck party.  Each girl brought a special drink/shot to share with the group.  It was our “low key” night in, however it turned into a late night with a very late night round of the game “never have I ever”.  Seriously, I don’t think I had played that game since high school, but what a fun thing to do on my last weekend as a single lady!

The next day we woke up and got ready for our party bus to arrive!  The ladies and I were headed to the beach to catch some rays and relax before our big night out that evening.  We all loaded onto the super cool bus and off we went.

About two thirds of the way there we all hear this huge POP!  The bus driver stayed calm and managed to pull over without any incidents.  We all pilled out of the bus and there was the culprit …

There wasn’t a whole lot we could do, but sit on the bus and wait.  This is where we went wrong. What we should have done was called a cab and had the bus company meet us at the beach.  Instead the bus driver kept assuring us it would only be another 30 minutes.  About 2-3 hours later they finally had a limo pick us up and drive us to the beach.  By the time we made it to the beach it was FULL and they were no longer letting people in.  We were all at a loss.  What should we do at this point?!

Luckily one of my friends jumped into action.  She called her friend who has a boat and he agreed to let a bunch of girls come hang out for a couple hours  … lucky him, right :)  Back to the city we went and spent a little fun in the sun on the boat.

The evening was spent having dinner at Lincoln and then we got our dance on at Josephine’s.  Despite the wheel going POP we had a great day!!!  I’m very lucky to have friends who just roll with the punches (so to speak).  The weekend showed me no matter what happens my friends and I always have a great time together … even if that means sitting on a hot party bus on the side of the highway for a few hours!

Do you have any “not so funny then”, but “kind of funny now” bachelorette weekend stories?

Happy Bachelorette Weekend!

Don’t forget to leave your tidbit by commenting and/or add Life’s Tidbits to your RSS Reader :)

Share

During the wedding planning process I started reading a lot of blogs.  Sooooo many brides were doing DIY projects.  The wedding blogs really got my planning/artistic juices flowing.  I would read about how simple it is to make X all on your own and immediately I would want to take on the DIY project.  I would gently remind myself I am not the artist in the family, that would be my sister, the MOH.

My friend from work was kind enough to share A LOT and I really mean A LOT of her wedding/party planning expertise with me.  One of her suggestions was to check out her friend’s blog called Aisle with Style.  As I was browsing the posts I found a post for the wedding invitations my friend had done for her brother’s wedding.  When I stumbled upon the blog post I instantly wanted to make my own invitations.  I emailed my friend and asked her for the details on the invitations she made for her sister-in-law’s wedding.  Then I forwarded the post to my then fiance and mother.

Both liked the invitations; however neither was excited about the DIY part.  My husband was very concerned about hidden costs of DIY as well as the time it would take us to do the invites.  I started pricing out invitations online.  The non diy invitations would still cost a pretty penny even from the online vendors I found.  While visiting my parents for Thanksgiving we spent sometime doing wedding stuff.  Sunday we went with my mom to register at Bloomingdale’s.  There just happen to be a paper/invitation store in the same complex so we stopped in to check out the invitation designs as well as pricing.  As I had assured both my mother and husband the invitations were expensive! Both were finally, mostly, on board with a little (or a lot as the case maybe be) DIY action.

After purchasing the paper and the pretty purple envelopes.  I could barely contain my excitement.  There was only one issue, I had a super old version of PhotoShop and it wasn’t compatible with a lot of the new functionality.  My husband to the rescue!  He quickly jumped onto his computer and downloaded a 30 day trial version of the newest PhotoShop version.  And then the fun began. YAY!

I spent many hours camped out on the couch, watching tv and and cutting our invitations and insert cards down to size.  Below is a little picture of how I totally took over the coffee table to create our invitations.

In the end we had three pieces to our wedding invitations – the invitations, room block insert card and rsvp post card insert.

After completing all the invitation the next step was to do the envelopes.  Check out our DIY invitation calligraphy here.  We also made custom stamps for our wedding invitations, which you can see here.

My tips for a successfully DIY invitation:

1)  Buy a paper cutter.  A good paper cutter is essential for straight lines and a sharp blade is ideal so the edges don’t fray.

2)  Make one complete invitation before printing 100 copies.  When I made my inserts I didn’t put it all together until I had printed multiple copies. I think realized the Room Block and RSVP text was way to big and had to reprint.  Waste of paper and time.

3)  Print High resolution.  I printed the 1st few on standard.  They looked nice, but when the husband took over the printing press he printed on High (he had no idea what setting I had used) the colors popped more and so we had to re-print the ones I had initially printed.

4)  Buy extra paper.  I suggest printing on regular white paper for a while until you think it is right.  See #2 and #3 I needed extra paper because of small modifications and printer settings.

5)  Start early.  Everyone laughed when I started my invitations 8 months out. But I wasn’t motivated some days or just plain didn’t have time.  Giving myself a lot of time to complete the project reduced my stress level and made it more fun.

Happy DIY!

Don’t forget to leave your tidbit by commenting and/or add Life’s Tidbits to your RSS Reader :)

Share

A few weeks ago we went to a friend’s beach themed wedding.  She had EVERY detail covered.  Knowing the amount of time and effort even small details take I can’t even imagine how many hours my friend put into everything for her wedding.

At her bachelorette party she mentioned they were going to have a Photo Booth at the wedding.  I had been to a wedding last year with a photo booth and loved it. At the last wedding I had taken pictures with friends, but by the time the husband and I made it to the booth it was closed.  Total pout! So this time I was determined to get a photo booth picture with my lovely husband.

After quickly locating the photo booth during cocktail hour I noticed a poster board.  On the posterboard there were a few photobooth pictures of my friend and (now) husband from other weddings.  She had the photo booth picture strip size increased and then added some cute text about taking pictures in the booth. I wish I had taken a picture of the poster board to show you exactly what it looked liked.

It took us the first two shots to understand where to look and how the booth worked. You would think two grown adults could successfully take pictures, but I guess we aren’t coordinated enough hahaha.  Here’s how our pictures came out:

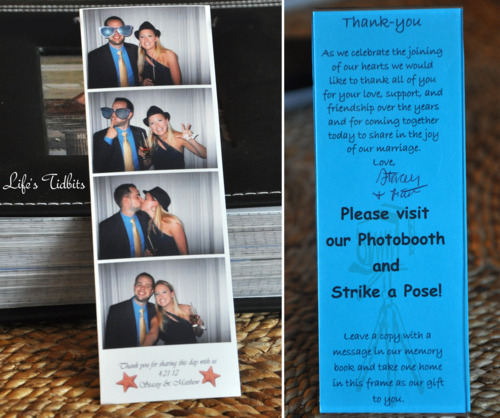
See what I mean? The first two we are a little caught off guard.  When we sat down at the table in the reception room we found these cute frames to put our photobooth picture into.

Each frame had a message from the bride and groom.  On the back there was a clear label with our name on it so we knew which frame was ours.Such a cute detail! I just love the message and idea to send each guest home with a frame.  Check it out!

And can you believe it … each one was hand signed by the bride and groom!  I told you this bride had every detail covered! :)

The cost of the frames seem pretty reasonable. I did a little Googling and found a number of places like this one.  There are many places that sell the perfect size frames for photobooth picture strips.

Have you seen this tidbit at a wedding before?

Happy wedding planning!!

Don’t forget to leave your tidbit by commenting and/or add Life’s Tidbits to your RSS Reader :)

Related Posts Plugin for WordPress, Blogger...
Share