Long before we moved into our new place, let alone closed on the condo, my husband was furiously searching for a wall mount for the tv.  He had a number of requires, but at the top of the list the mount had an arm that would allow the tv to swing out.  This would enable us to watch tv while cooking in the kitchen.  Thank goodness for our open floor plan or the swing out arm would have been a moot point.

Being the sweet man that my husband is, I was consulted numerous times on which mount I liked the best.  I really didn’t care and told him to choose and purchase whatever he thought was best.  After much search and deliberation he decided on a Cheetah Wall Mount.  Two days later the mount arrived … yay for Amazon Prime’s two day shipping.

Above is our before picture.  The tv stand was purchased from Pier 1 Imports and the dvd rack from Best Buy back when I was in college. I would say they’ve both seen better days and it is about time we replace them.  Installing the tv wall mount was the perfect first step.

First step was to find two studs.  Luckily we are in possession of a stud finder.  We marked where the center of the studs were and then we measured and drill four holes for the screws.  The wall mount is A LOT heavier than we imagined it would be.  The husband held up the wall mount while I screwed in the washer with the screw.

Then we went ahead and screwed the arms onto the back of the tv and hung it. The cool part about the wall mount is it has a built in level “bubble”.

After a few tweaks it was leveled and hanging on the wall!  We also took the plunge and invested in a new tv stand to use with our new fancy wall mounted tv.  The living room is finally coming together … so exciting!

To celebrate our newly mounted tv we cooked dinner and rented a movie on demand. :)

Happy home improvements!

Don’t forget to leave your tidbit by commenting and/or add Life’s Tidbits to your RSS Reader :)

Share

Despite having his and her closets in the master bedroom we didn’t have a place to hang our clothes for the first 3 weeks we lived in our new place.

The husband took out the existing rod and shelf from both closets the weekend before we moved in while we were painting the bedroom.  It took some brute force and a little finessing,  but in the end the closet lost it’s “builder” look.

Here’s a helpful video I found one how to pull out builder closets if you have questions. I made the husband watch the video and concurs with the process.

Then we used putty that goes on pink and drys white. This way we knew that it was 100% dry before sanding it down.

After puttying, letting it dry and then sanding it down we were ready to paint.  We used the Origami White to paint the inside of the closets.  The closets took a lot more paint than I ever would have thought of so we ended up having to buy an extra quart to finish it off. I’m not going to lie, we totally hit the ceiling in a couple places and didn’t bother to touch it up.  I mean really, who looks in your closet, up at the ceiling and then stares looking for slight imperfections – no one, therefore no touch-ups hahaha.

Despite being ready to install our new closet organizers, we hadn’t actually purchased anything.  I considered pulling the trigger on a ClosetMaid and a Rubbermaid closet organizer.  I was having trouble deciding on how to design the closets, which was very much impacting my ability to purchase anything.

Memorial day weekend we FINALLY pulled the trigger and purchased our closet organizers.  After delivery, installation and a little unpacking of the clothes we are all set up with his and her closets!!!

Here’s the thing, my husband’s stuff just doesn’t take up the whole closet.  AND since we don’t have a linen closet, my husband graciously agreed to allow me to put a few additional shelves in his closet for the towels, sheets and extra pillows/blankets.  So of course, back to the store we went to return stuff we didn’t need and purchased a few extra shelves.  Although I wish we had them installed prior to move in, I am absolutely loving our closet organizers!!

His and her closets are complete:

Happy home improvements!

Don’t forget to leave your tidbit by commenting and/or add Life’s Tidbits to your RSS Reader :)

Share

Previously on our honeymoon series: Positano, Sorrento and Cinque Terre. Now that you are all caught up let’s talk ROME!

After another extremely long train ride we arrived in Rome!  I feel like our last stop was the most cultural.  Rome was a great way to spend our last few days in Italy and on our honeymoon.  We stayed in downtown Rome and within walking distance of the at the Artemide Hotel.  On the evening we arrived we were starving after checking into the hotel.  We walked down the street to a local bar.  We had a little food as well as a drink and just people watched for a while.

Heading to Rome? Here is a sample itinerary for what to do if you have a few days in Rome, Italy. Honeymoon travel guide

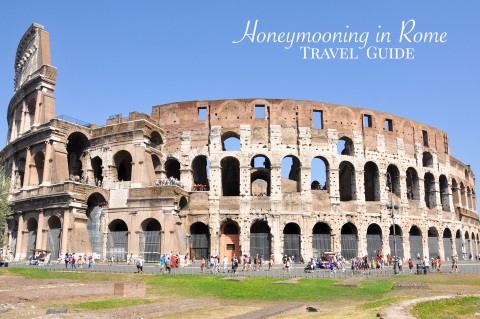
Day 10: Colosseum, Palatine Hill and Roman Forum

After breakfast, at the hotel, we headed to the Colosseum.  We packed plenty of water and suntan lotion into our backpack as well as the camera.  Rome in mid-August is HOT HOT HOT!  The ticket line at the Colosseum was super long.

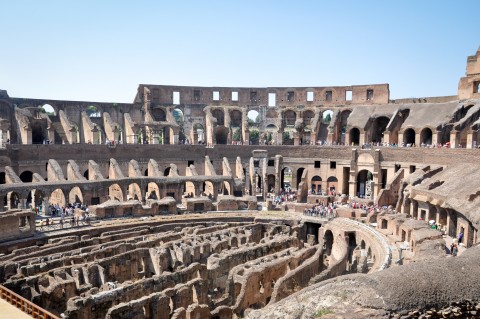
In order to skip the line we decided to join a tour.  This was a bad idea.  Although they got us into the Colosseum rather quickly, the tour really didn’t provide any substantial information.  The time spent within the Colosseum was very limited before they tried rushing us off to the next two locations – Palatine Hill and the Roman Forum.

There was no reentry to the Colosseum and we weren’t done exploring so we opted to stay behind and really soak it all in.  The tour guide didn’t give us our tickets so we wouldn’t be able to get into Palatine Hill without being with the group.  Saying behind meant we would need to purchase tickets again to gain entrance to the other sites.  Tourist fail and we absolutely felt like we had been scammed, but it was the only issue we encountered the entire time we were in Italy.  Lesson learned!

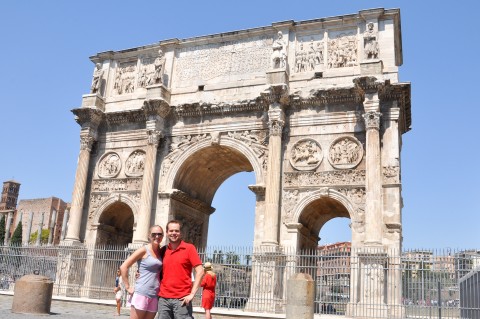
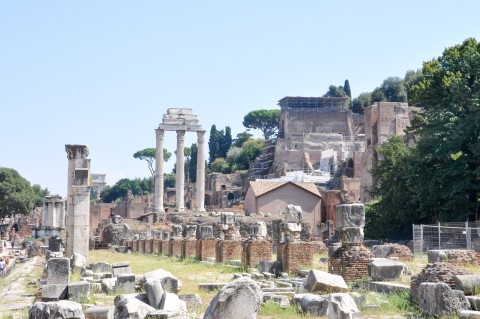
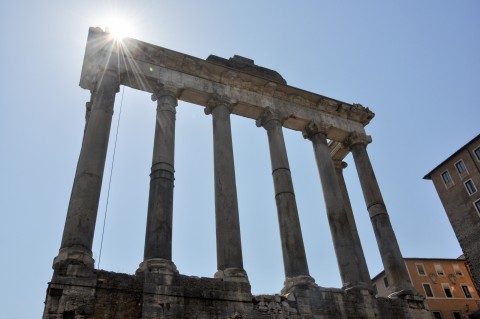
After walking around the Colosseum we headed over to the  Palatine Hill and the Roman Forum.  The line was SO short.  After getting our fill of tourist stuff we headed back to the hotel to relax and get ready for dinner.

TIP – Go to Palatine Hill and buy tickets there for the Colosseum.  The lines at Palatine Hill/Forum are SO much shorter the Colosseum.

RomeItaly-1

RomeItaly-2

RomeItaly-3

RomeItaly-4

RomeItaly-5

RomeItaly-6

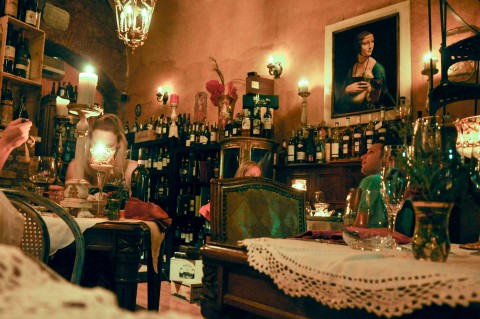
Restaurant Romantico came highly recommended so we made a reservation through Facebook.  The ambience and food did NOT disappoint!  The restaurant was quaint and very romantic … perfect for a honeymoon.

Restaurant Romantico Rome, Italy

Restaurant Romantico Rome, Italy

Day 11:  Capital Hill, Pantheon, Spanish Steps and Trevi Fountain

We had trouble deciding what to do on our last day.  Torn between the Vatican and a self guided tour around Rome to see a bunch of sites.  In the end a self guided walking tour won out.  Although we really wanted to see the Vatican we also weren’t excited about missing all the other great sites around the city.  Our guided tour went like this:  Capital Hill, Pantheon,  lunch at Life Pizzeria, Spanish Steps to the Trevi Fountain.

Things to do in Rome

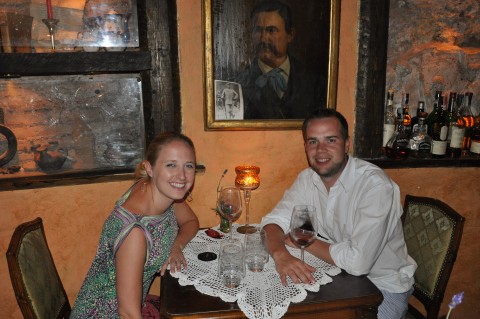
Our last dinner in Rome was at La Pentolaccia.  The owner of the restaurant suggested a fabulous bottle of wine and helped us choose great meals.  After dinner he suggested we get have some of their homemade limoncello.  It was delicious and the meal was a great bookend to our honeymoon!

La Pentolaccia Restaurant in Rome, Italy

Side Note:  The wine in this picture is actually sold at Costco in VA!  When I told the husband I found a wine from our honeymoon at Costco he didn’t believe me.  Luckily I took a picture of the bottle and was able to PROVE to him it was in fact a “honeymoon” wine. :)  Every time we buy the wine we reminisce a little about our trip.

Day 12: Heading Home

We took an EARLY cab ride to the airport and checked our flight back to the states.  Does anyone remember that crazy hurricane from last summer?  Well we do!  When we arrived at the airport a number of flights to New York and New Jersey were already cancelled.  We were fortunate and our flight from Rome to Boston to DC was still on schedule.

Apparently when we were already inflight to Boston our connecting flight to DC was cancelled.  This was actually not a big deal since my parents live in MA so we had a place to stay.  PLUS they had been watching Sophi so we got to be with our puppy too!  After a couple nights with my parents and sister we flew back to DC with the dog and started our life in DC as husband and wife!

Have you been to Rome?  What was your favorite restaurant or thing to do?

Don’t forget to leave your tidbit by commenting below :)

Share

When we toured the condo, we eventually ended up buying, I didn’t notice the cabinets didn’t have hardware on them.  In fact I am not even sure I would have ever noticed they were missing (until we moved in) unless the husband had pointed it out.  At first we assumed the hardware just hadn’t been installed yet; we were wrong.  Apparently the builder purposely didn’t add knobs to the cabinets. In his experience buyers “don’t usually like” the hardware he chooses and therefore all the units in the building come sans knobs in the kitchen.

This missing knobs tidbit also showed up on the report from the home inspector.  The seller agreed to have the hardware installed for us if we purchased and provided the knobs prior to closing.  Knobs were at the very bottom of our to do list in the weeks prior to closing. We had to start packing, work, attend a wedding, travel to NY for a family event and oh so much more. As you can imagine the whole not having hardware in the kitchen didn’t really take precedent.

We had perused knobs at Home Depot, but hadn’t loved anything.  Then the husband found Knobdepot.  Our knobs had to be brushed nickel in order to match the appliances/faucet in the kitchen.  This was kind of nice because it helped us narrow down our choices.  In the end we ended up choosing these.  Modern with a twist {pun intended … hehehehe}.

Since we didn’t get the knobs purchased prior to closing we were either going to have to hire someone to install them or do it ourselves.  My handy husband was pretty convinced he would be able to install the hardware himself.  Our knobs came with a free template, however it wasn’t the right size?!?! I mean really, why send us a free template that is too small for our knobs?  LUCKILY the husband is handy, like I said, and he went ahead and modified the vertical and horizontal template to be usable.

Here’s how they look:

Not so sexy, but extremely effective!

We learned something very important when installing the first knob – drill through the front of the cabinet, not the back. When we drilled from the back to the front there was some splintering on the front of the cabinet :(  Luckily we did the test on a cabinet that isn’t front and center.  Also we added masking tape to the inside of the cabinets to help minimize the splintering on the inside.

Hold the template up to the cabinet door.

Drill a little bit through each of the two holes to make a mark on the cabinet.

Check to make sure the holes are level and then drill through each of the holes.

Screw the knobs onto the cabinet and check that it is level again.  Along the way we made small modifications to the holes to make sure they were level.

After they are all screwed in it looked like this:

I love how the cabinets look.  Since we got use to not having knobs I still find myself grabbing the top of the cabinet to pry it open. I’ve got to start taking advantage of our new bling bling.

Happy home improvements!

Don’t forget to leave your tidbit by commenting below :)

Share

I have always loved me some chocolate. Make that a molten lava cake a la mode and I’m ALL IN!  As someone with a serious sweet tooth I often make restaurant choices based on their dessert menu.  On weekends when I was home from college my mom would ask me where I wanted to go to dinner. I would almost always opt for The Lyceum (which apparently is now closed – just found that out when Googling it).  Anyways, I found Paul Deen’s recipe for Molten Lava Cakes and decided to give it a whirl.  Let me just say it is YUMMMMMOOOO! I could eat it everyday, but everything in moderation, right?!

Ingredients:
6 (1-ounce) squares bittersweet chocolate
2 (1-ounce) squares semisweet chocolate
10 tablespoons (1 1/4 stick) butter
1/2 cup all-purpose flour
1 1/2 cups confectioners’ sugar
3 large eggs
3 egg yolks
1 teaspoon vanilla extract

Directions:
Preheat oven to 425 degrees F and grease 6 (6-ounce) custard cups.  Melt the chocolates and butter in the microwave, or in a double boiler.  A double boiler is simply steaming water that doesn’t touch the glass bowl above it.

Combine the flour and sugar in a bowl and the eggs/yolks in another bowl.

Add the flour/sugar mixture to the melted chocolate/butter.

Stir in the eggs and yolks until smooth. Stir in the vanilla.  Divide the batter evenly among the custard cups.

Place in the oven and bake for 15-18 minutes. The edges should be firm but the center will be soft and a little runny.  If you plan to save a few lava cakes for another night like we did, I would suggest slightly under cooking them say 12ish minutes.  That way when you reheat them you won’t cook the center through.

Run a knife around the edges to loosen and invert onto dessert plates.  Add a scoop or TWO of vanilla ice cream to make lava cake a la mode!  Serve and enjoy. Super yummy!!!

Happy cooking!!

Don’t forget to leave your tidbit by commenting and/or add Life’s Tidbits to your RSS Reader :)

Related Posts Plugin for WordPress, Blogger...
Share