The title sounds worse than it is by A LOT, but I thought it accurately summed up the situation.  My husband will tell you I am one of those people who loves something in the store (or online) and then immediately second guesses my choices once the item is purchased and home.  For example when we got our dining room table chairs I obsessed about if the cream went okay with the beige/darker cream couches we have. I think it took a good two weeks for the buyers remorse to dissipate.  I love the chairs and think they look great … so seriously what was up withe the buyers remorse?

If it happens with purchases like a pair of jean or a chair, then clearly the buyers remorse would kick in for a wedding dress, right?

I started watching “Say Yes to the Dress” before I got engaged and once we were engaged I thought heck I will try on 5 or 10 dresses and find the one I want quickly.  Unfortunately I wasn’t a 5-10 dress kind of bride. I think I was probably more in the 30-40 range.  I would chalk a lot of that up to trying on almost any dress suggested so I could narrow down what it was I really wanted.

I tried on a lot of dresses before deciding on THE dress. The day I found my wedding dress I was with my MOH and one bridesmaid.  And just to make things interesting the dress I decided was THE ONE happen to be part of a trunk sale.  This dress was only going to be in the store for that weekend and then it would be packed up and sent to another bridal shop.  There was no way I was going to buy a wedding dress without my mother seeing it. The owner of the store suggested we skype with her, however while having lunch, my sister and I decided my mother should fly from Boston to DC just for the day.

Oh yes I am that crazy and thought it was TOTALLY appropriate to have my mother fly in Sunday morning and out that evening just to see the dress.  After some serious convincing my mother agreed to fly in for the day.  We found a “reasonably” priced ticket and the next day she arrived bright and early to do some dress shopping.  Smartly, she requested that we go to at least one other store so she could have other dresses to compare THE dress too.

We began at Hannelore’s and I tried on two dresses for her.  The first and the immediate favorite at that store looked like this:

Anne Barge, Style 612

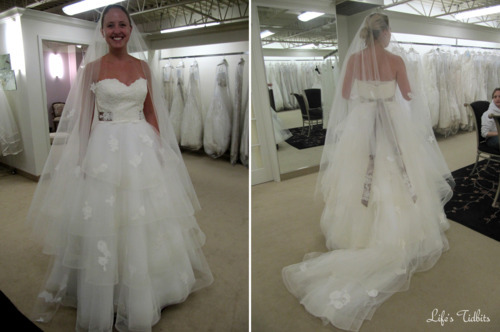
The second, which I had liked the first time, but not loved got cut almost immediately. We quickly realized in pictures you couldn’t see the beautiful lace in the boddus.  It just didn’t “pop” to us.  Here’s the second dress:

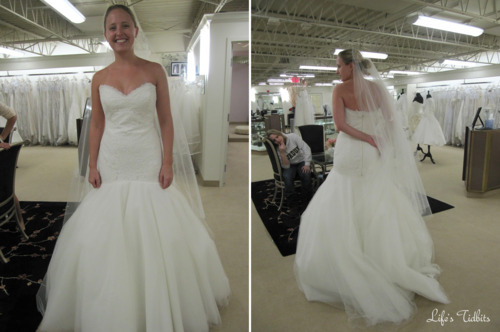
Romona Keveza Legends 804 – Look at my sister in the background … how bored does she look. hahahahaha. It was because she knew it wasn’t the right dress!

After taking my measurements for the first dress and pretty much talking myself out of the dress my mother had initially flown in to see we headed to Love Couture.

They already had “the” dress as well as one other I had been considering ready for us.  I slipped into the dress and was grinning ear to ear.  As my sister had predicted while we were in Hannelore the Stephen Yearik dress was a better match for the look I was going for.  Here we are trying on the dress at the store:

Stephen Yearick

Two days later the buyers remorse kicked into high gear. I started pulling up the two dresses and comparing/contrasting them. My sister, the MOH, kept telling me I was crazy for doubting my initial decision. I waffled back and forth for the next few months. I started checking out second hand versions of the Anne Barge dress and seeing if I could afford (heck no!!) the second dress I liked as well.

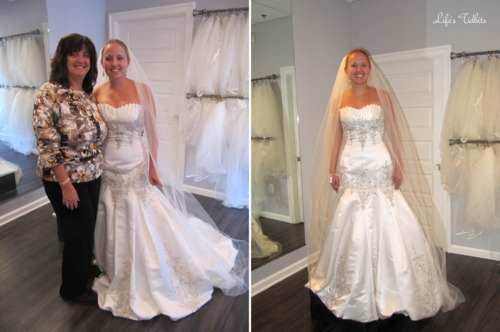
In the end all the buyers remorse was erased when I went to the store to try my dress on the day it came in!  After the alterations, makeup, jewlery and all the other good bridal stuff here’s how it looked on our wedding day:

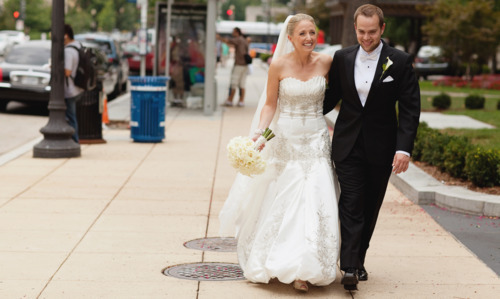
Photo Credit: Korie Lynn Photography

Thanks for taking a walk down memory lane with me.  Buyers remorse be gone because on the day of our wedding I wouldn’t have wanted to be in any other dress!

Happy Dress Shopping!

Don’t forget to leave your tidbit by commenting below :)

Share

After making our wedding invitations, calligraphy envelopes and then rehearsal dinner invitations oh and the escort cards I figured why not make the menu cards as well?!?!

We went back and forth about having 2 menu cards per table or a a menu card for each guest.  In the end since the cost difference was minimal we decided to go for a menu card for each guest.

DIY Wedding Menu Cards | Life's Tidbits

What you need:

Paper cutter, Printer/Ink, Card Stock and Photoshop or MS Word

Menu cards are one of those things you can do ahead of time, but no too far ahead. It’s important to have had the tasting and finalized the WHOLE menu.  If the menu isn’t finalized then some reprinting might be in your future.  When using PhotoShop my suggestion is to paste the menu text into MS Word first so everything is spelled correctly.  Even with my husband and I both double checking the menu card we missed a spelling mistake and had to reprint a number of menus. :(  Thank goodness one of the bridesmaids caught the mistake!  Oh and don’t forget to figure out approximately how many menu cards are needed. I made a few extras just incase.  The extra menus weren’t used, but it was nice to have a “clean” one for the wedding scap book!

Menus come in all shapes and sizes.  An important thing to consider when deciding on a size is will it be big enough to fit all the text.  We had three entree choices (fish, chicken and vege), which took up a lot of room on the card.  I went with long thin menu cards – 3.5 by 11.  Partly this was because of the text length, but honestly it made for easy paper cutting as well … one cut and done.

For the wedding and rehearsal dinner invitations I did the paper cutting after the printing. For the menus I cut the paper first and then did the printing.

I didn’t really have a menu “inspiration” card, however I did reference the menu cards of weddings I had previously been to. I decided I wanted a small image/graphic at the top and then the rest of the card to have a clean look. To tie the menu card in with the rest of the wedding paper items I re-used (FREE!) fonts: Mutlu Ornamental and Adobe Pro – from the Wedding Invitations and Allegro – from the DIY Calligraphy Envelopes.

We also used the same type of paper from the wedding/rehearsal dinner invitations, but in a different color – light purple!  The light purple looked great with the gold table clothes and sterling silver roses on each of the tables.  Here’s how they looked:

Photo credit: Korie Lynn Photography

I went back and forth on rounding the edges of the menu, but in the end my mother and husband liked the non-rounded look better.

My tips are pretty much consistent with other printing related projects I’ve blogged about:

  • Print on High Resolution
  • Spell check!
  • Print tests on white paper before doing a test on your nice card stock.  White paper is far less expensive!
  • Don’t wait to the last minute.

Happy DIY and Wedding Planning!!

Did you make your own menus? Any tidbits for other brides you can share?

Don’t forget to leave your tidbit by commenting below! :)

Share

Big, BIG things happening for us as of late.  Apparently we don’t know how to do low key/boring. :)

2010 – Engagement
2011 – Wedding/Honeymoon
2012 – PURCHASE OUR FIRST HOME!!!!!!!!!!
2013 – ??? I’m sure we will find something to spice things up next year!

Remember back in February when we turned 30 and went on our lovely trip to Mexico? Well the day before we left for vacation we found out the owner of the condo we rent is planning to sell.  What did this mean for us? Well it meant we had to move and do it within the next few months.  STRESSFUL! The thought that we would need to move, or that our apartment would be sold, was nowhere on our radar.

We had planned on building up our saving account a little more and then purchasing our first home.  The plan was to move at the end of the summer (or possibly early 2013).  With the news of an impending sale coming our way, the purchasing timeline was moved up.  Our move out date was no longer being driven by our savings account but by our current landlord’s desire to sell.

Despite our initial freakout everything has worked out pretty well.  We have a friend who’s a realtor so we called him the day we found out about needing to move and he got us hooked up with the lender that afternoon.  Within a week of coming back from vacation we were preapproved for a place and ready to start the big search.

While we were drinking margaritas and relaxing on the beach the husband and I came up with our must have and like to have lists for our first home.

Here is what our list looked like in order of priority …

Must Haves:

  1. Within our ideal price range
  2. In DC (not Maryland or Virginia)
  3. Pet Friendly – we can’t part with little Miss. Sophi!
  4. 2 bedrooms
  5. Washer/Dryer
  6. Walking distance to a metro

Like to Haves:

  1. Parking Space
  2. Plenty of Storage
  3. 1.5 or 2 bathrooms
  4. Patio and/or balcony
  5. Fireplace

I felt like this was a pretty good list to begin with and began stalking RedFin for listings. After looking at a few condos in person, our must have list started to change a little.  We quickly realized a large living/dining area was important to us.  Small bedrooms were okay as long as the living space was big.  I feel like I do two to three things in the bedroom.  Sleep, get dressed and watch tv. I don’t need a massive amount of space for any of those.  Also, it became very clear places under ~800 sq feet were just too small.  As it turns out the one bedroom we rent is slightly over ~800 square feet so when you add a second bedroom but don’t increase the size of the unit the living space shrinks considerably.  TIP: find out the square footage of your current place before you start looking at places (to rent or buy).  This  will help you to gauge what square footage is ideal for you.

After viewing at least 20+ places in person and probably over 100 online we ended up putting an offer in and after a week of negotiations the place was officially UNDER CONTRACT.  WOOT WOO!!!

Based on our initial list we end up with the following:

Must Haves:

  1. Within our ideal price range – FAIL we went over the initial budget
  2. In DC (not Maryland or Virginia) – CHECK
  3. Pet Friendly – CHECK
  4. 2 bedrooms – CHECK
  5. Washer/Dryer – CHECK
  6. Walking distance to a metro – CHECK

Like to Haves:

  1. Parking Space – Fail
  2. Plenty of Storage – Fail … well kind of.
  3. 1.5 or 2 bathrooms – CHECK
  4. Patio and/or balcony – CHECK
  5. Fireplace – Fail

PLUS our living/dining room is HUGE and get a ton of natural light, win win!!  Overall I would say we made out VERY well with our first homeowner purchase.

Looking back at the process here are a few things I think we did right and a few more I wish we had done:

  • Go with your gut. If you love it then you love it and if you don’t there are always more places coming onto the market so don’t settle.  For those of you who purchased a wedding dress and had “this is THE dress” moment that will happen for your home too!
  • View a lot of places and even take a look at places you aren’t sure look great online. Not all places photograph well (or the owner just puts up crappy pictures).  We found a few I wasn’t sure about online and then really liked in person.
  • Remember the paint color (or wallpaper) can always be changed!
  • Determine what the deal breakers are. For example I hated when the second bedroom didn’t have a window (which didn’t come to light until we saw a few places like this).  It didn’t bother my husband, but we agreed when things are a deal breaker for one of us then the place is out.
  • Figuring out what you can afford and comfortable spending BEFORE you start looking and don’t look out places above your price range.  I mean let’s be honest if you find a place for 100k that you like, but then look at a place for 500k 9 times out of 10 you are going to like the more expensive place.  Just don’t tease yourself it isn’t worth it I promise (same thing goes for wedding dress brides!!!).
  • Going back to the first choice place at least once before putting in an offer or shortly there after. It felt so good to walk into the condo and confirm I LOVED it.
  • Getting the paperwork in order while looking for a place. I wish I had asked the Lender for a list of the paperwork we were going to need to provide (bank statements, w-2s, paychecks, etc) to get fully approved.  The documents takes a while to compile and if you are like me, you might have forgotten how to access some of your 401k accounts online.
  • Don’t take the negotiations personally.  The seller wants the highest price possible and you want the lowest.  Some back and forth is to be expected.  We had a hard time with this because we felt our initial offer was very reasonable/fair.

And remember to RELAX and try to ENJOY purchasing your first home!!

Related blogs coming up soon: Moving, painting and other homeownership related projects.

What tips do you have for a first time home buyer?  Do you have any pre-move in tips for us?

Don’t forget to leave your tidbit by commenting below :)

Share

I don’t know why, but back in February I became slightly obsessed with making red velvet cupcakes.  I wanted to make them for my 30th birthday, however my husband told me cooking for my own birthday celebration was a no-no! :)  Little did I know he had already purchased my favorite cake vanilla on vanilla.  Plain Jane over here, but I do spice things up from time to time.

I’ve heard a ton of stories about red velvet cupcakes ending up too dry so I was weary of picking a recipe to follow.  I ended up referencing the follow recipes which can be found here (primarily used), here and here.

For my first try at these somewhat finicky cupcakes they turned out great! My husband tried the batter and loved it. Then talked about how great the house smelt the whole time they cooked.  He’s my designated frosting checker and gave the A-OK on that little number as well.  In the end the final cream cheese frosting on a red velvet cupcake was a success in our house tonight!

What you will need for the cupcakes:

  • 1 cup (2 sticks) unsalted butter, softened
  • 1 1/2 cups sugar
  • 2 eggs
  • 1/4 cup (2 oz) red food coloring
  • 1/4 cup unsweetened cocoa powder
  • 2 1/2 cups all-purpose flour
  • 1 tsp salt
  • 1 tsp baking soda
  • 2 tsp vanilla
  • 1 cup buttermilk
  • 1/2 cup sour cream
  • 1 Tbsp white vinegar

NOTE:  3 tbsp of coco powder is equal to about 1/4 cup – in case you are referencing other recipes like I did.

Preheat oven to 350. Line muffin tin with baking liners.

Cream butter and sugar on medium-high for two minutes. Mix in one egg at a time, beating after each addition.

Combine food coloring and cocoa powder to bowl. Watch out for your clothes! I got food coloring all over one of my favorite shirts … pout!  Turn the mixer to low and add to the butter/sugar/egg mixture until just incorporated and then beat on medium for 4 minutes.

Sift together the flours, salt, and baking soda and set aside. Stir buttermilk and vanilla together.

Add dry ingredients to the bowl in three batches, alternately with the buttermilk in two batches, starting and ending with the dry ingredients. Beat on medium until just combined.

Add sour cream and vinegar and beat on low until combined.

Fill muffin cups 3/4 full and bake for 20-30 minutes.  Check the cupcakes at about 15 minutes with a toothpick to see how they are coming along.  Let cool on a wire rack or in the pan.

While the cupcakes are cooking or cooling make your frosting.

What’s needed for the frosting:

  • 16 oz cream cheese, softened
  • 10 Tbsp butter, softened
  • 2 tsp vanilla
  • 3 cups powdered sugar, sifted

Combine the cream cream cheese, butter, and vanilla in the mixer at med speed.  Add the powdered sugar to the bowl in small batches, while beating on low.  Be careful not to add too much or it was dust you and the counters with sugar as it combines. :) Once fully combined beat on high until desired consistency is reached.

For a stiffer icing, add more powdered sugar.  If needed add a little milk to make the icing softer (you shouldn’t need to do this).

Put your icing into an icing bag and cut off the tip of the bag.

Apply the icing in circles from the outside in.  You should have some frosting left over.  It’s a little too much frosting for 24 cupcakes.

Happy Cooking!

Do you have any tips on making red velvet cupcakes?

Don’t forget to leave your tidbit by commenting below :)

Share

We began our honeymoon in Positano and then we were off to Sorrento.  Day 6 was spent on the train heading north to Cinque Terre.  The trip was long and I read an entire book on the train ride there!  The trip wasn’t over when we arrive at the Monterosso train station.  We then had to shlep our luggage up a hill to the hotel.  Then it was official … we had arrived in Cinque Terre!

Cinque Terre, Italy: Honeymoon Part |  Life's Tidbits

Screen shot from Google Maps

We stayed at the #1 hotel in Monterosso, at least according to TripAdvisor, Hotel Villa Steno.  The hotel was great and the view was amazing.  We made good use of our balcony during our stay. I would definitely recommend a balcony with an ocean view!

Day 7: Day at the Beach

After sleeping in a little, we lathered up with sun tan lotion and headed to the beach!  The day was spent ocean side reading, tanning and hanging out.  The beach was beautiful and while relaxing on the beach I read Sarah’s Key, which is a great book and I highly recommend it.

Cinque Terre, Italy: Honeymoon Part |  Life's Tidbits

After a drink on the balcony and taking in the beautiful views we decided it was time for some PIZZA! Nothing had compared to the first place we found in Positano, however we were going to try to find something at least close.  As always we used the TripAdvisor app on the iPhone and decided upon Pizzeria Da Ely.  The pizza was very good and we were able to land a seat outside without having a reservation. :)  After a lovely dinner and bottle of wine we headed back to the hotel.

Cinque Terre, Italy: Honeymoon Part |  Life's Tidbits

Monterosso al Mare shuts down a lot earlier than Sorrento and Positano did.  For us this was a good thing, because the next day we planned to hike the 5 cities of Cinque Terre!

Day 8: Hiking Cinque Terre

We woke up early, which was a nice change and headed directly to breakfast.  After breakfast we packed water bottles, sunscreen and the camera into our backpack and headed towards the trail for our big hike.  We hiked from Monterosso to Vernazza.  I honestly don’t think I’ve ever sweat so much in my entire life.  It was SO hot and although the hike wasn’t hard there were enough stairs to make it so I couldn’t control the sweating. Hahaha.  Sexy, right?

Anyways after finally reaching Vernazza we stopped for lunch at Gianni Franzi.  I had the pasta with meat sauce it was A-Mazing.  After resting for a while we began the hike to Corniglia.  Once we arrived in  Corniglia it was time for a drink at a cute little bar.  The path from Corniglia to Manarola was closed for some reason so we would have to hop on the train to Manarola and then we could finish the hike through the cities.

The path closure was about all the level of excuses we needed to skip the last two cities (Manarola and Riomaggiore).  It was hot and we were tired from already hiking for the better part of the day.  We got on the train and headed back to our beautiful hotel.  We sat on the balcony, watched the sunset and savored our last evening in Cinque Terre.

Here are a few pictures from the hike:

Cinque Terre, Italy: Honeymoon Part |  Life's Tidbits

So beautiful!!! Even though we didn’t finish the hike I am glad we enjoyed the portion that we did do.  I think if it wasn’t so hot then we would have done the whole thing.  On our last night we went to Il Casello for dinner.  The food was great and the view of the ocean was perfect.  I think this is a place that only takes cash though … just a little fyi/heads up if you decide to go.

Day 9 would be spent on the train to Rome – our final stop on the honeymoon.

Caio! See you in Rome!!!

Happy traveling.

Don’t forget to leave your tidbit by commenting below :)

Related Posts Plugin for WordPress, Blogger...
Share