Today, let’s chat rocking chairs slash gliders for the nursery.  For someone who get motion sick ALL the time (cars, planes, boats), it’s a little weird, but I love chairs that rock/move.  The husband and I discussed purchasing a chair for the nursery pretty early on.  I spent a lot of time looking at chairs online and trying to determine which would be best.  While online shopping is great and I’m a huge fan of not having to leave the house to make a purchase, there are somethings – like chairs – where it is just SO much easier to shop for in person.

My in-laws were in town visiting a couple weekends ago and offered to go crib shopping with us.  For someone who prides themselves on being a planner and getting things done ahead of time I’ve been a complete slacker/procrastinator on the nursery purchasing front!  I hang my head in shame as I admit … there is a VERY good chance the crib won’t be here by Jellybean’s due date.  At least I know she will be in the bassinet for a few weeks, which makes me feel a little less guilty.  Anyways, while we were out looking at cribs the husband and I took the opportunity to check out chairs for the nursery as well.

It was great to sit in the chairs and figure out what we were really looking for.  There are just SO many options: glider, recliner/glider, rocker, etc. it was honestly a bit overwhelming.  The husband and I knew we wanted a chair for the nursery that would look good if moved to another room, like the living room or tv room, in a few years.

Here is my nursery chair inspiration board:

Nursery Glider / Rocking Chair Inspiration | Life's Tidbits
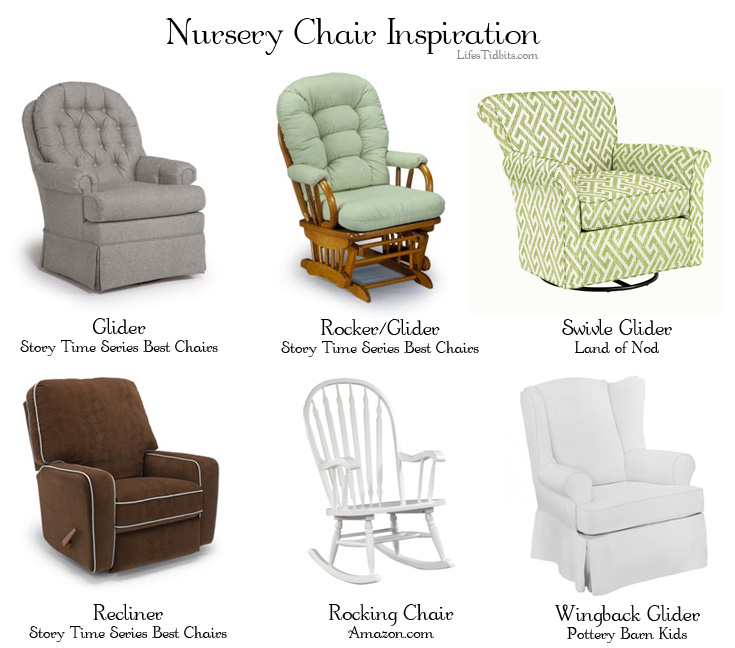
Glider Story Time / Rocker & Glider Story Time / Swivle Glider Land of Nod

Recliner Story Time / Rocking Chair Amazon.com / Wingback Glider Pottery Barn Kids

Regardless of which chair we purchased an ottoman was a must have.  I love elevating my feet, plus I’ve heard when you are feeding late at night being able to put your feet up is ideal.  I was kind of partial to the glider/recliner/ottoman combo options, however in the end the hubby and I decided upon a simple glider with matching ottoman.  While at the store I went through the fabric book a couple of times making note of potential options.  My MIL and husband gave their input and we slowly started narrowing it down.  The store owner was hilarious when it came to choosing a fabric.  He told me “Don’t be shy.  Order as many swatches as you want … I do a lot of business with this company.”  With that we ordered a couple gray, white and cream sample fabrics.  Last week the fabrics arrived and we finally made a decision to go with one of the medium-dark gray fabrics!!

The chair is our second big purchase for the nursery!  It feels like we are finally making progress on the baby’s room and we are just 9 weeks away from her bid debut (hopefully).  Just like with the dresser, I think I will wait until the “big” Jellybean nursery reveal post to show you exactly which chair/color we chose. =)

Did you purchase a chair for your nursery?  If so was it nice to have and what type of chair did you get?

If you enjoyed this post, please add your tidbit by commenting below.  Don’t forget you can follow us on PinterestInstagramFacebook and Twitter.

Share

Long before we found out Jellybean’s gender I started pinning ideas for the baby’s nursery.  It started off being both boy and girl room ideas.  If Jelly had been a boy we probably would have gone with a nautical themed nursery.  One of the very first things I fell in love with was a mint green french/vintage dresser (below).  It didn’t take long before I had pinned a variety of dressers all with the same feel, but in a number of different colors and details.  The more dressers I found, the more I feel in love.  Who needs to find the perfect crib … when swooning over the perfect dresser!  LOL.

Here is my mood board and inspiration for a vintage / french dresser:

Vintage/French Nursery Dresser Inspiration / Shabby Chic | Life's Tidbits

All found via Pinterest – On to BabySourceSouth County A to Z / Mama Say WhatBlogs Baby Center

From Pinterest I clicked through to a number of different blogs and read about their nursery decorating decision AND, most importantly for me at the time, where they found the vintage dresser enter … Craigslist.  Ugh, while I love Craigslist it is sometimes like trying to find a needle in a haystack.  Luckily we have/had time on our side.  Once or twice a week I would search vintage dresser, french dresser and shabby chic dresser on Craigslist.  There were always at least a few good options available.  It was hard to find the perfect combination of affordable price, not too far a drive from DC and the condition of the dresser.

After my 24 week doctor’s appointment my sister and I started doing some serious online browsing for the nursery.  We were discussing color, overall vision and style of the room.  While we chatted I browsed Craigslist for a dresser … and BAM the perfect dresser appeared.  It was exactly like the mint green dresser (above) I originally fell in love with, but in white … PLUS a  BONUS … a nightstand with the same vintage/french look was also for sale.

The next day we drove out to take a look at both pieces.  Though originally we hadn’t planned on purchasing a nightstand, the husband and I couldn’t pass it up.  We scooped up both pieces of furniture and two days later they were delivered to our place.  Yay for a delivery option.  Made life SO much easier.

It is so exciting to have furniture purchased for our little girl’s room.  It makes this whole “we are having a baby” thing that much more real!!  Dresser, nightstand … check and check.  Back to tackling the crib I suppose.  :)

What was the first piece of furniture you purchased for your baby’s nursery?  Where did you get your dresser from?

Happy Decorating!

If you enjoyed this post, please add your tidbit by commenting below.  Don’t forget you can follow us on PinterestInstagramFacebook and Twitter.

Share

I have already told you about painting a red accent wall in our bedroom.  There were a few pieces of trim to fix, but all in all the accent wall in the bedroom is complete.  Because we had painted some sample paints on two of the three other walls in the room we had to paint the three other walls so they would all be the same color.  Why we didn’t put all samples on one wall to start is beyond me. It would have saved us some serious time to have left those walls as is.  There was builders grade paint already on the walls so we considered doing touch ups to the walls instead of picking a brand new color.  When we went to the Duron store to buy the paint and they told us that color/style only comes in a 5 gallon bucket. That was WAY too much paint and the cost wasn’t so pretty.  Back to the drawing board we went.

While searching for a shade of gray for the living room I had picked up a Sherwin Williams color wheel.  We decided it was as good a place as any to start the search for a white/cream color for the bedroom.  Quickly we realized Origami White (7636) was very similar to the color already on the wall.  It was slightly lighter and had more gray/brown tones and less yellow in it.  We taped the swatch up on the wall for a few days to make sure we liked it.

As the designated paint runner I was off to Sherwin Williams to pick up the paint once we decided to go with Origami White.  I was concerned one gallon wouldn’t be enough paint for the three wall and inside of the closet and the husband was convinced 1 gallon was plenty.  He could tell it was making me nervous so we agreed on buying a gallon and a quart.  This way we had a quart of paint as back up for the closets OR if we mark up the walls while moving in.

I purchased the paint in satin, which is pretty much the same finish as eggshell.  After my last mix up with paint finish I looked up satin vs. eggshell before allowing the SW employee to place my order.  It took me about two hours to paint the edges and three walls in the bedroom. I also managed to put about 3-4 spots on the ceiling when using the roller extension.  Oopsies!

But that wasn’t the only oops that happened while painting the bedroom.  Sophi backed onto the lid of a paint can while trying to rescue her ball from the plastic wrap.  Before I could grab her she promptly ran onto the small patch of hardwood floor that wasn’t covered in plastic.  So we had three little white paw prints on the floor to deal with.

Luckily after allowing the paint to dry on the floor we were able to scratch it off with finger nails.  Looked like nothing had ever happened.  As I pulled off all the tape and threw the plastic on the floor away I started to realize our bedroom was 95% completed!  I grabbed the can of ceiling paint and touched up the couple of spots I had inadvertently painted.  Then I screwed the light switch and outlet plates back on and what do you know it looked like a real room again!!

Here’s the before, during and after:

Although I would like to call the bedroom a wrap we still have a few things left to do.

1.  Remove existing closet shelf/poll, putty/paint sed closet and then install the new closet organizers

2.  Decided upon, purchase and install blinds.

At this point we are 4 days away from move in. I am not convinced we are going to be able to get all that completed before we move in.  Our currently place is only 1/2 packed and the movers arrive Saturday morning at 8am.  We better get a packin’ don’t you think?!?!?!  We are hoping to at least complete demolition on the closets so the dust doesn’t get all over our furniture.  Cross your fingers for us!!

Don’t forget to leave your tidbit by commenting below :)

Related Posts Plugin for WordPress, Blogger...
Share