I really like watching the Food Network cooking shows.  One of the chefs I really like is Anne Burrell.  She make some great recipes, but also I just love her level on energy on the show.  In any event, a while a go I watched the show where she makes garlic chicken with Israeli couscous.  Last night I was craving Israeli couscous so I looked up Chef Burrell’s recipe for inspiration.  Israeli couscous is more fluffy and pasta like than “regular” couscous.  If you’ve never had it before it’s definitely worth a try.

After figuring out what I had in the house I decided to make a simpler version of the recipe while trying to get the same type of flavors in my chicken breasts.  I am happy with how it came out and will be adding this recipe to the dinner rotation.

Garlic Chicken Ingredients:

~ 1 lb Chicken Breasts
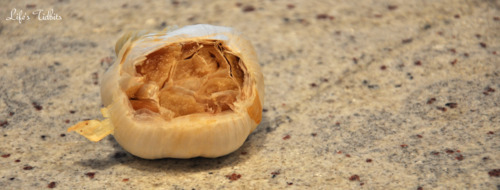
1 whole garlic bulb
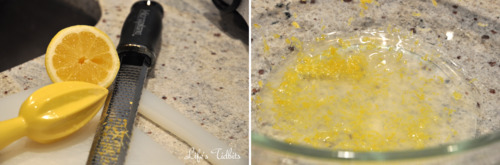
1/2 lemon, zested and juiced
1/4 tsp thyme
1/2 tsp ground cumin seeds
Pinch crushed red pepper flakes
Kosher salt
Extra-virgin olive oil

Preheat the oven to 350 degrees F. Put the garlic bulb straight on the oven rack and roast it is soft when squeezed, about 30 minutes. Remove them from the oven and let cool.

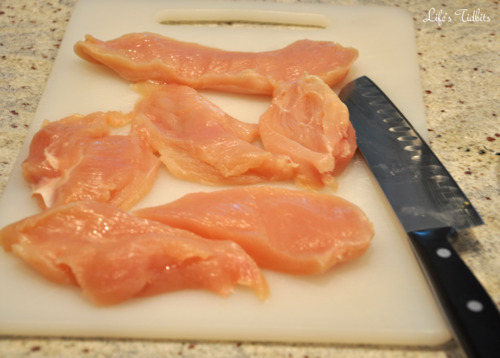
While garlic is roasting, prep the chicken by removing any fat and cutting into large chunks (about 6).

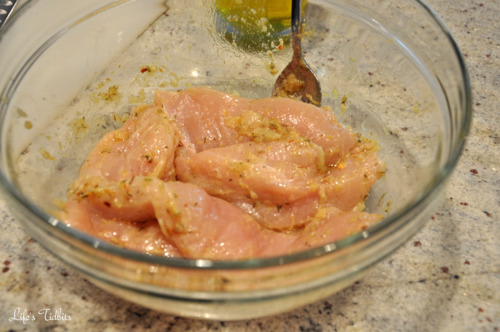
In a bowl combine the lemon zest, juice, thyme, cumin, red pepper flakes and salt then set aside.

When the garlic bulbs are cool, slice the tops off.

Squeeze out the roasted garlic into the bowl.  Add a little olive oil and mash the mixture into a loose paste. Combine with the chicken pieces and let sit for at least 1 hour.

Once the chicken has marinated grill, bake or stove top cook it.

Couscous Ingredients: 

1 cup of Israeli Couscous
1 and 1/4 cups of Chicken Broth
2 Scallions/Green Onions

Bring a chicken broth to a boil over.  Add the couscous, reduce to a simmer and cover for about 8-10 minutes.  watch the couscous closely as sometimes the water boils out too quickly.  You can also completely shut the heat off and cover it.

Cut all of the green onion into thin slices.  Once the couscous is cooked mix in the green onions.

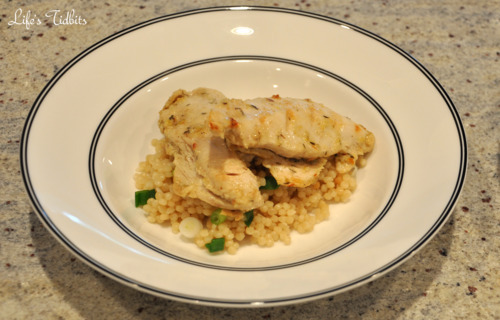
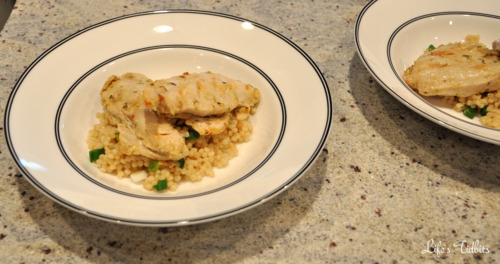
I like to serve it in shallow bowl. Add the couscous/onion mixture and then place the cooked chicken on top.  This recipe makes 3-4 servings.

Looks so pretty and it’s yummy too!

Happy Cooking!

Don’t forget to leave your tidbit by commenting and/or add Life’s Tidbits to your RSS Reader :)

Share

After making our wedding invitations, calligraphy envelopes and then rehearsal dinner invitations oh and the escort cards I figured why not make the menu cards as well?!?!

We went back and forth about having 2 menu cards per table or a a menu card for each guest.  In the end since the cost difference was minimal we decided to go for a menu card for each guest.

DIY Wedding Menu Cards | Life's Tidbits

What you need:

Paper cutter, Printer/Ink, Card Stock and Photoshop or MS Word

Menu cards are one of those things you can do ahead of time, but no too far ahead. It’s important to have had the tasting and finalized the WHOLE menu.  If the menu isn’t finalized then some reprinting might be in your future.  When using PhotoShop my suggestion is to paste the menu text into MS Word first so everything is spelled correctly.  Even with my husband and I both double checking the menu card we missed a spelling mistake and had to reprint a number of menus. :(  Thank goodness one of the bridesmaids caught the mistake!  Oh and don’t forget to figure out approximately how many menu cards are needed. I made a few extras just incase.  The extra menus weren’t used, but it was nice to have a “clean” one for the wedding scap book!

Menus come in all shapes and sizes.  An important thing to consider when deciding on a size is will it be big enough to fit all the text.  We had three entree choices (fish, chicken and vege), which took up a lot of room on the card.  I went with long thin menu cards – 3.5 by 11.  Partly this was because of the text length, but honestly it made for easy paper cutting as well … one cut and done.

For the wedding and rehearsal dinner invitations I did the paper cutting after the printing. For the menus I cut the paper first and then did the printing.

I didn’t really have a menu “inspiration” card, however I did reference the menu cards of weddings I had previously been to. I decided I wanted a small image/graphic at the top and then the rest of the card to have a clean look. To tie the menu card in with the rest of the wedding paper items I re-used (FREE!) fonts: Mutlu Ornamental and Adobe Pro – from the Wedding Invitations and Allegro – from the DIY Calligraphy Envelopes.

We also used the same type of paper from the wedding/rehearsal dinner invitations, but in a different color – light purple!  The light purple looked great with the gold table clothes and sterling silver roses on each of the tables.  Here’s how they looked:

Photo credit: Korie Lynn Photography

I went back and forth on rounding the edges of the menu, but in the end my mother and husband liked the non-rounded look better.

My tips are pretty much consistent with other printing related projects I’ve blogged about:

  • Print on High Resolution
  • Spell check!
  • Print tests on white paper before doing a test on your nice card stock.  White paper is far less expensive!
  • Don’t wait to the last minute.

Happy DIY and Wedding Planning!!

Did you make your own menus? Any tidbits for other brides you can share?

Don’t forget to leave your tidbit by commenting below! :)

Share

We began our honeymoon in Positano and then we were off to Sorrento.  Day 6 was spent on the train heading north to Cinque Terre.  The trip was long and I read an entire book on the train ride there!  The trip wasn’t over when we arrive at the Monterosso train station.  We then had to shlep our luggage up a hill to the hotel.  Then it was official … we had arrived in Cinque Terre!

Cinque Terre, Italy: Honeymoon Part |  Life's Tidbits

Screen shot from Google Maps

We stayed at the #1 hotel in Monterosso, at least according to TripAdvisor, Hotel Villa Steno.  The hotel was great and the view was amazing.  We made good use of our balcony during our stay. I would definitely recommend a balcony with an ocean view!

Day 7: Day at the Beach

After sleeping in a little, we lathered up with sun tan lotion and headed to the beach!  The day was spent ocean side reading, tanning and hanging out.  The beach was beautiful and while relaxing on the beach I read Sarah’s Key, which is a great book and I highly recommend it.

Cinque Terre, Italy: Honeymoon Part |  Life's Tidbits

After a drink on the balcony and taking in the beautiful views we decided it was time for some PIZZA! Nothing had compared to the first place we found in Positano, however we were going to try to find something at least close.  As always we used the TripAdvisor app on the iPhone and decided upon Pizzeria Da Ely.  The pizza was very good and we were able to land a seat outside without having a reservation. :)  After a lovely dinner and bottle of wine we headed back to the hotel.

Cinque Terre, Italy: Honeymoon Part |  Life's Tidbits

Monterosso al Mare shuts down a lot earlier than Sorrento and Positano did.  For us this was a good thing, because the next day we planned to hike the 5 cities of Cinque Terre!

Day 8: Hiking Cinque Terre

We woke up early, which was a nice change and headed directly to breakfast.  After breakfast we packed water bottles, sunscreen and the camera into our backpack and headed towards the trail for our big hike.  We hiked from Monterosso to Vernazza.  I honestly don’t think I’ve ever sweat so much in my entire life.  It was SO hot and although the hike wasn’t hard there were enough stairs to make it so I couldn’t control the sweating. Hahaha.  Sexy, right?

Anyways after finally reaching Vernazza we stopped for lunch at Gianni Franzi.  I had the pasta with meat sauce it was A-Mazing.  After resting for a while we began the hike to Corniglia.  Once we arrived in  Corniglia it was time for a drink at a cute little bar.  The path from Corniglia to Manarola was closed for some reason so we would have to hop on the train to Manarola and then we could finish the hike through the cities.

The path closure was about all the level of excuses we needed to skip the last two cities (Manarola and Riomaggiore).  It was hot and we were tired from already hiking for the better part of the day.  We got on the train and headed back to our beautiful hotel.  We sat on the balcony, watched the sunset and savored our last evening in Cinque Terre.

Here are a few pictures from the hike:

Cinque Terre, Italy: Honeymoon Part |  Life's Tidbits

So beautiful!!! Even though we didn’t finish the hike I am glad we enjoyed the portion that we did do.  I think if it wasn’t so hot then we would have done the whole thing.  On our last night we went to Il Casello for dinner.  The food was great and the view of the ocean was perfect.  I think this is a place that only takes cash though … just a little fyi/heads up if you decide to go.

Day 9 would be spent on the train to Rome – our final stop on the honeymoon.

Caio! See you in Rome!!!

Happy traveling.

Don’t forget to leave your tidbit by commenting below :)

Share

I know I am a bad blogger and I still haven’t told you about how we made our own wedding invitations, but that DIY project was a HUGE undertaking. Honestly, I’m not completely sure how to walk you through the process step by step … YET.  So instead I started thinking maybe I would just begin by sharing our DIY rehearsal dinner invitations.

After determining the location, invite list and all that fun stuff for the rehearsal dinner I decided we (the husband and I) should DIY own rehearsal dinner invites.  We had left over card stock from the wedding invite inserts as well as extra envelopes (from our DIY Calligraphy).  I mean it would have been such a waste not to take advantage of the left over paper materials, right?!?!?! ;)

Early on I found Wedding Paper Divas. They have fabulous invitations for various occasions, in fact it is the website we purchased our save the dates from.  I quickly found this rehearsal invitation, which served as my inspiration for our DIY invites.

Image Credit: Wedding Paper Divas

What you need:

Photoshop has a 30 day FREE trail you can download.  We used a 30 day trial to create the initial draft of our wedding invitations. In the end we ended up purchasing Photoshop.  We planned to use it not only for wedding stuff, but also for my budding photography hobby!  If you plan to go the 30 day trial route, make sure to save the final version of your invitation as a PSD, JPG and TIFF file. This will ensure you are able to print the design even after your trail expires.

To ensure we could use some of our left over envelopes, I knew the invitations would need to be 5×7.  Once I had the size I found a free image online of a chandelier and downloaded it. From there I Googled rehearsal dinner text and placed it on the initial version of the invite.  After that it was just a matter of finding a layout we liked as well as fonts.

The majority of the text is in a renaissance font, which is free to download!  Then for our names I used the same font we used on our invitations for our names, again a free font you can download.  I felt using a little of the same font as the wedding invitations tied everything together.

I didn’t take a lot of pictures of the process, which is a bummer, so I can only really describe what I did.  I printed two invites on each piece of card stock and then used my handy dandy paper cutter to make them 5×7. I printed a number of test versions on plain paper before using the card stock.

This is one of the test versions, please excuse the crappy blackberry camera shot:

I had printed almost all of the rehearsal dinner invites when I remembered I had purchased a paper rounder punch. I decided to go ahead and use one of my test invites and round the corners to see how it looked.  I ended up loving it and the husband was in agreement.  A bunch of punches later we had rounded edges instead of sharp corners.

Here’s what the rehearsal dinner invitation looked like totally finished:

Here are a couple of extra tips:

  1. SPELL CHECK!
  2. Print test versions on plain white paper before doing a sample on your nice card stock.
  3. Print using High resolution.
  4. Make sure you have enough paper.  You will need extra for test prints as well as if you detect a mistake. Or if like me your ink cartridge starts to die so some invites are better than others.
  5. Start early.  Even though you don’t have to print as many rehearsal dinner invitations as wedding invites (usually) they still take time.  Better not to be up against a deadline.

Happy Planning!

Don’t forget to leave your tidbit by commenting below :)

Share

So remember when I made the tortilla soup?  I mentioned how I loved that recipe as well as the meatball recipe from the 4 Hour Body diet.  I’ve never been a big sausage person, however for some reason I LOVE it in this meatball recipe. If you wanted to make this slightly more healthy you could substitute in ground turkey and turkey sausage.

I’ve made this recipe a number of time with a couple different variations.  The latest version include a whole bag of spinach. I think it makes the meatballs look more appetizing as well as putting your vegetable serving right into the meatball!  I wish I could take credit for this idea, but it was my friend’s idea.

Ingredients:

1 lb ground beef
1 lb spicy (or sweet) Italian sausage
1 tsp garlic powder
2 tbsp Italian seasoning
½ small yellow onion, roughly chopped
½ cup almond meal (or bread crumbs or wheat germ)
2 eggs, whisked
1 tsp red pepper flakes
Black pepper and salt to taste
1 package chopped spinach (cooked)

Cook the frozen chopped spinach per the directions on the bag.  Meanwhile combine all the other ingredients in a glass bowl and mix together.  Don’t forget to remove the Italian sausage from its casing.

Once the spinach is done cooking allow it to cook and then squeeze as much of the water as possible out of the spinach.  You don’t want soggy meatballs!  Mix in the spinach.  It’s best to do it with your hands (gross I know!).

Create ~24 medium size meatballs.

Recipe Spicy Meatballs, 4 Hour Body / Slow Carb Diet | Life's Tidbits

Pre-heat your grill pan (these can also be cooked in the oven if you prefer).  Once hot, add the meatballs. Fry 5–7 minutes, until bottom is browned.

Recipe Spicy Meatballs, 4 Hour Body / Slow Carb Diet | Life's Tidbits

Turn meatballs to opposite side and cook for another 5–7 minutes. It will take several batches to cook all 24 meatballs.

If on the 4 hour body diet serve it with lentils or black beans.  If not, then your pantry is your oyster.  These will taste great with almost any side!

Recipe Spicy Meatballs, 4 Hour Body / Slow Carb Diet | Life's Tidbits

About three meatballs is a serving. And boy does this meal make a fabulous lunch.

Happy cooking!

Don’t forget to leave your tidbit by commenting below :)

Related Posts Plugin for WordPress, Blogger...
Share