Who’s the most excited of them all?!  Oh that would most definitely be me.  As I’ve shared (here and here) we’ve been doing some decor updating in the living/dining room as well as the hallway (here and well here too).  I’m not sure if I should qualify this area by the front door as the hallway or the living room, but either way we have a new mirror on the wall!

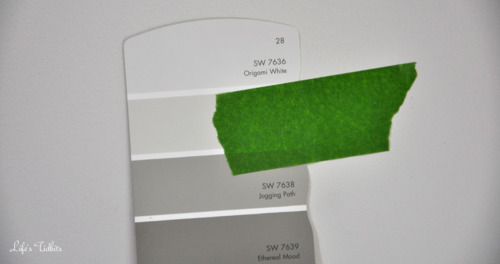
When we first move into our condo the electrical box was kind of sticking out like a sore thumb.  The dark gray contrast on the painters grade white paint was like BAM as soon as you walked in.  The plan was to find a painting or a mirror at some point to cover the box, however in the mean time we needed to make it less noticeable.  So while we were painting the living room and hallway the electrical box was also painted over.
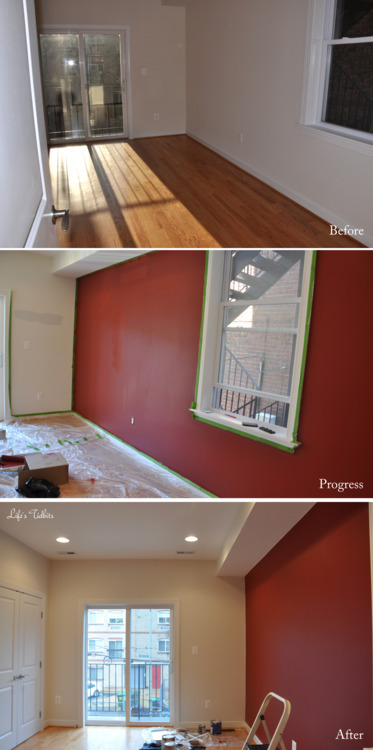
Before:

Progress: Added a couple coats of primer on the electrical box.

I don’t have an after picture of the box painted … I’m a bad blogger, I know (hangs head in shame).  I always peruse the Joss & Main and consider buying all the great items they have.  Then one evening I found the Andretta Wall Mirror, which the husband agreed would be a go to hide the electrical box.  I waited too long and the item was no longer available … bummer!  A couple weeks later I happened upon the mirror again and decided I would purchase it as soon as the husband got home and confirmed he still liked the mirror.

Just a few days later the mirror arrived at our front door. I was shocked at how heavy the mirror was, but managed to carry it up the stairs and into the apartment.  The poor husband had barely walked through the door when I began asking (read nagging) him to hang the mirror.  Being the good natured guy he is out came the tool box and level and within no time the mirror was hanging on the wall.  =)

After:

Now I think a new chest/table with drawers for under the new mirror is needed and we will be done with this area of the apartment.  I’ve had that semicircle table since COLLEGE!  Although it has held up well, it is time for a change/upgrade.  Plus something with storage would come in handy for scarfs, gloves, sunglasses and other stuff of that nature.

For now though I am happy to have the electrical box covered and a mirror to double check my outfit/makeup as I walk out the door! LOL.

So what do you think of the new mirror?

Happy Decorating!!

If you enjoyed this post, please add your tidbit by commenting below.  Don’t forget you can follow us on PinterestInstagramFacebook and Twitter.

Share

It is no surprise our guest bathroom is the first to be completed.  It was the first room we painted, purchased an accessory for and probably the smallest “area” within the house.  Before we moved into the condo my mother took me shopping at Home Goods for the VERY FIRST time ever!  Can I just say I love that store?!  I purchased a little vase and fake flower arrangement I thought would be perfect for the back of the toilet seat.  It was the first accessory for our new place and a first for the bathroom as well.  The bathroom came together slowly, but when we hung the final picture behind the toilet and the guest bathroom project was officially a wrap.

A few weeks after painting the bathroom I finally went to Bed Bath and Beyond to purchase a shower curtain and bath mat.  We had guests (my family) coming into town and we couldn’t very well have them shower without a curtain or mat!  While my family was in town us girls went on a little shopping trip.  We went to Pier 1 Imports and purchased the balcony furniture, but before that we hit up Home Goods.  At Home Goods we found the bathroom accessories!  Slowly but surely the bathroom was coming together.

The Son of Man painting like so many other things was sitting in our spare bedroom waiting for us to find  the perfect place for it in the new house.  In our first apartment together it hung in the living room and in our second apartment in the hallway near the front door.  Now it has found a home in the second bathroom!  The green apple ties in perfectly with the light green paint.

All we had left to do was find some painting or picture for behind the toilet seat above the little fake flower arrangement.  After we hung the hallway pictures the husband and I decided to purchase the another picture frame from Amazon for the bathroom.  My husband actually made the suggestion as to which picture should populate the new frame.  I was well, pleasantly surprised!!  He suggested we use a picture of Sophi, our dog, from our engagement session.  She looks so cute and happy in the picture.  I used PhotoShop to turn the colored picture to black and white.  Uploaded the picture to Shutterfly, ordered and a few days later we were in business.

So the guest bathroom if officially decorated!  BUT here’s the things as I started writing this last paragraph I realized there were other things needed for the bathroom … seriously decorating never seems to be really finished.  So what else could we possibly need you might ask?  New towels that match our new fancy bathroom.  Towels are at the bottom of my home shopping list, therefore I still feel comfortable saying the bathroom is a wrap!

What was the first room you finished decorating in your place?

Don’t forget to leave your tidbit by commenting and/or add Life’s Tidbits to your RSS Reader :)

Share

After painting the guest bath, master bedroom and the living/dining room the only thing left to paint was the master bathroom.  We had agreed to leave the builder grade paint in the guest room until we decide exactly what we plan to do with that room.  The guest room is pretty much a landing zone or storage room at the minutes, which clearly isn’t ideal.  Anyways, similar to the living/dining room choosing a color for the master bath wasn’t easy.  We ending up going with a color that’s a shade darker than our living/dining room after putting couple different samples on the wall.

Once we were pretty sure we wanted the color we put a big color swatch on the wall.  Do you see my reflection in the shower?  Hahaha I was attempting to document the process.

After painting the guest bath we knew that the correct paint to buy was semi-gloss.  We “assumed” the guest and master bath were approximately the same size we purchase 1 quart of paint.  We were well, WRONG!  The master bath is slightly bigger so we really needed two quarts of paint.  Back to the store I went to pick up the extra quart.  Then something disastrous happened.  We started painting the remaining wall and somehow the color just was NOT the same. I really don’t know what happened … the husband and I stood there looking at the wall and then at each other and we were seriously PERPLEXED.  In any event it was unanimous that we needed another quart of this paint in an effort to resolve the issue.

Back to Sherwin Williams we went to purchase our THIRD quart of this paint.  We were so excited to get home and make that final wall match all the rest that we  pulled out all the painting supplies and got to work.  Clearly this damn bathroom just didn’t want to be painted … I’m not sure how it happened by the roller started shedding and the wall started to look all textured.  At this point we were so perplexed I didn’t even think to break out the camera to document the disaster that was unfolding.  We attempted to wipe the wall down with paper towels and start over, but that was an epic fail leading to an empty paint can and a textured wall.

After letting the wall dry and sanding it back to “normal town” we were ready to being painting the dreaded wall again.  SOOOOO back to the paint store we went for a fourth and final time.  The husband goes in to buy the paint and when he got back to the car he looked a little defeated …

Me – “What’s wrong?”

Husband – “The just asked me if I was aware of how many quarts of the same colored paint we’ve purchased.”

Me – “Too many … but it wasn’t our fault there were so many issues.  Didn’t you tell him all the issues we had.”

Husband – “Nope.  Just told him I was aware we should have purchased a gallon at the start of this project.”

Me – “Oh okay then.”

My poor husband was so horrified that we had to purchase so many quarts that he wouldn’t own up to the issues we encountered when the sales man pointed out we purchased incorrectly. :)

After the fourth quart of paint we were FINALLY able to fix the remaining wall and put a little extra paint on the other walls. Unfortunately I haven’t master the process of having paint colors show up correctly in pictures when there is zero natural light.  Therefore there is no great “after shot”.   Sorry :(.   It was SO nice to call that project a wrap after four tries LOL.  Overall I love the color of the bathroom.  Now I am on the hunt for a new bathroom mat and accessories.  Somehow the to-do list never seems to dwindle!

Happy home improvements!

Don’t forget to leave your tidbit by commenting and/or add Life’s Tidbits to your RSS Reader :)

Share

And no we aren’t talking about the book in this post.  Although I have heard fantastic things about the 5o Shades of Grey trilogy; I just haven’t had time to read the books yet. They are at the top of my list after I finish the Book Thief!

Instead we are back to the painting theme of the last few weeks and referring to the 50+ different paints I looked at in various shades of gray for the living room and hallway.  I honestly had no idea that gray could have hints of blue, purple and brown. It’s crazy how one color can have three “looks”.  A color online is different from the color swatch and then the color swatch can look different depending upon lighting and decorations within a room.  It’s really crazy how a color that’s considered neutral can take on a life of its own.  We had to stop looking at color swatches in our old place, because they looked so different in our new place.

While on the search for a living room shade of gray I realized I am somewhat afraid of color as well.  Afraid in the sense that I didn’t want to go too dark and have the walls take over the room.  Then there was the issue of not being able to visualize color sample on the wall painted on the whole wall let alone the entire room.  Despite knowing I was new to painting (as a form of decorating) I was very shocked at how difficult I found it the whole process.  I was all about finding the PERFECT color.

My husband was more than happy to slap whatever version of gray (that made me happy) up on the walls and call it a day.  We ended up purchasing so many sample paints I think the cost was close to a gallon .. oopps.  After 8 colors painted in “small” rectangles on one wall and 2 HUGE nondescript shapes painted on the walls we FINALLY chose our version of gray.

Luckily for me my husband is a taping machine.  I mean honestly taping takes FOREVER! It shocked both of us the amount of time it took him to tape things.  We tried to do a little painting without the tape, but neither of us have steady enough hands for that. :)  It took us a while to figure out how to paint/tape the bulk heads.  At first we thought we’d paint the whole thing the same color, but then I noticed the bottom of the bulk head was painted the same color a the ceiling.  We double checked all three rooms and they were the same.  So we only painted the “walls” of the bulk heads our new color.

Below is the husband checking out his taping handy work.

After much taping and covering up the hardwood floors our living room was ready to be painted!  So we go to it.

After a FULL, long and exhausting day of painting the room was finally done!!!  Despite the tape we still had a few oopsies.  To make sure we would know what to fix the next day we went back to the condo to do the touch ups.  See all the little blue dots … lots of little mistakes.

After doing touch up our living/dining room was ready for our stuff!  Although it took us forever to pick in a color in the end we love it and it was worth the multiple trips to the paint store.  The next weekend we moved into our new place … and all that was left was to unpack …

Happy home improvements!

Don’t forget to leave your tidbit by commenting and/or add Life’s Tidbits to your RSS Reader :)

Share

I have already told you about painting a red accent wall in our bedroom.  There were a few pieces of trim to fix, but all in all the accent wall in the bedroom is complete.  Because we had painted some sample paints on two of the three other walls in the room we had to paint the three other walls so they would all be the same color.  Why we didn’t put all samples on one wall to start is beyond me. It would have saved us some serious time to have left those walls as is.  There was builders grade paint already on the walls so we considered doing touch ups to the walls instead of picking a brand new color.  When we went to the Duron store to buy the paint and they told us that color/style only comes in a 5 gallon bucket. That was WAY too much paint and the cost wasn’t so pretty.  Back to the drawing board we went.

While searching for a shade of gray for the living room I had picked up a Sherwin Williams color wheel.  We decided it was as good a place as any to start the search for a white/cream color for the bedroom.  Quickly we realized Origami White (7636) was very similar to the color already on the wall.  It was slightly lighter and had more gray/brown tones and less yellow in it.  We taped the swatch up on the wall for a few days to make sure we liked it.

As the designated paint runner I was off to Sherwin Williams to pick up the paint once we decided to go with Origami White.  I was concerned one gallon wouldn’t be enough paint for the three wall and inside of the closet and the husband was convinced 1 gallon was plenty.  He could tell it was making me nervous so we agreed on buying a gallon and a quart.  This way we had a quart of paint as back up for the closets OR if we mark up the walls while moving in.

I purchased the paint in satin, which is pretty much the same finish as eggshell.  After my last mix up with paint finish I looked up satin vs. eggshell before allowing the SW employee to place my order.  It took me about two hours to paint the edges and three walls in the bedroom. I also managed to put about 3-4 spots on the ceiling when using the roller extension.  Oopsies!

But that wasn’t the only oops that happened while painting the bedroom.  Sophi backed onto the lid of a paint can while trying to rescue her ball from the plastic wrap.  Before I could grab her she promptly ran onto the small patch of hardwood floor that wasn’t covered in plastic.  So we had three little white paw prints on the floor to deal with.

Luckily after allowing the paint to dry on the floor we were able to scratch it off with finger nails.  Looked like nothing had ever happened.  As I pulled off all the tape and threw the plastic on the floor away I started to realize our bedroom was 95% completed!  I grabbed the can of ceiling paint and touched up the couple of spots I had inadvertently painted.  Then I screwed the light switch and outlet plates back on and what do you know it looked like a real room again!!

Here’s the before, during and after:

Although I would like to call the bedroom a wrap we still have a few things left to do.

1.  Remove existing closet shelf/poll, putty/paint sed closet and then install the new closet organizers

2.  Decided upon, purchase and install blinds.

At this point we are 4 days away from move in. I am not convinced we are going to be able to get all that completed before we move in.  Our currently place is only 1/2 packed and the movers arrive Saturday morning at 8am.  We better get a packin’ don’t you think?!?!?!  We are hoping to at least complete demolition on the closets so the dust doesn’t get all over our furniture.  Cross your fingers for us!!

Don’t forget to leave your tidbit by commenting below :)

Related Posts Plugin for WordPress, Blogger...
Share