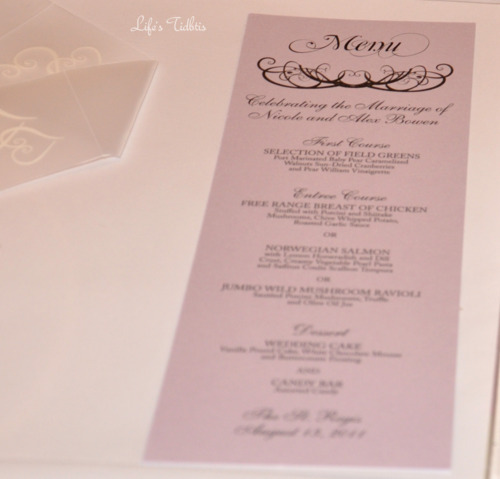
A few weeks ago we went to a friend’s beach themed wedding.  She had EVERY detail covered.  Knowing the amount of time and effort even small details take I can’t even imagine how many hours my friend put into everything for her wedding.

At her bachelorette party she mentioned they were going to have a Photo Booth at the wedding.  I had been to a wedding last year with a photo booth and loved it. At the last wedding I had taken pictures with friends, but by the time the husband and I made it to the booth it was closed.  Total pout! So this time I was determined to get a photo booth picture with my lovely husband.

After quickly locating the photo booth during cocktail hour I noticed a poster board.  On the posterboard there were a few photobooth pictures of my friend and (now) husband from other weddings.  She had the photo booth picture strip size increased and then added some cute text about taking pictures in the booth. I wish I had taken a picture of the poster board to show you exactly what it looked liked.

It took us the first two shots to understand where to look and how the booth worked. You would think two grown adults could successfully take pictures, but I guess we aren’t coordinated enough hahaha.  Here’s how our pictures came out:

See what I mean? The first two we are a little caught off guard.  When we sat down at the table in the reception room we found these cute frames to put our photobooth picture into.

Each frame had a message from the bride and groom.  On the back there was a clear label with our name on it so we knew which frame was ours.Such a cute detail! I just love the message and idea to send each guest home with a frame.  Check it out!

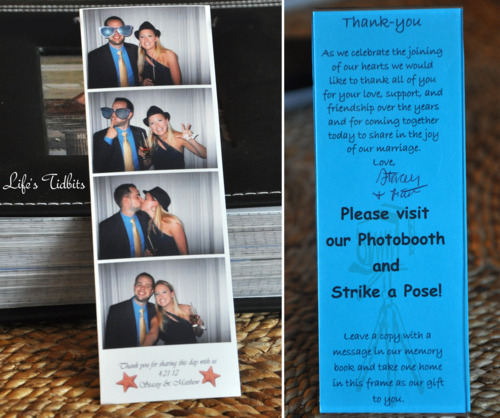
And can you believe it … each one was hand signed by the bride and groom!  I told you this bride had every detail covered! :)

The cost of the frames seem pretty reasonable. I did a little Googling and found a number of places like this one.  There are many places that sell the perfect size frames for photobooth picture strips.

Have you seen this tidbit at a wedding before?

Happy wedding planning!!

Don’t forget to leave your tidbit by commenting and/or add Life’s Tidbits to your RSS Reader :)

Share

After making our wedding invitations, calligraphy envelopes and then rehearsal dinner invitations oh and the escort cards I figured why not make the menu cards as well?!?!

We went back and forth about having 2 menu cards per table or a a menu card for each guest.  In the end since the cost difference was minimal we decided to go for a menu card for each guest.

DIY Wedding Menu Cards | Life's Tidbits

What you need:

Paper cutter, Printer/Ink, Card Stock and Photoshop or MS Word

Menu cards are one of those things you can do ahead of time, but no too far ahead. It’s important to have had the tasting and finalized the WHOLE menu.  If the menu isn’t finalized then some reprinting might be in your future.  When using PhotoShop my suggestion is to paste the menu text into MS Word first so everything is spelled correctly.  Even with my husband and I both double checking the menu card we missed a spelling mistake and had to reprint a number of menus. :(  Thank goodness one of the bridesmaids caught the mistake!  Oh and don’t forget to figure out approximately how many menu cards are needed. I made a few extras just incase.  The extra menus weren’t used, but it was nice to have a “clean” one for the wedding scap book!

Menus come in all shapes and sizes.  An important thing to consider when deciding on a size is will it be big enough to fit all the text.  We had three entree choices (fish, chicken and vege), which took up a lot of room on the card.  I went with long thin menu cards – 3.5 by 11.  Partly this was because of the text length, but honestly it made for easy paper cutting as well … one cut and done.

For the wedding and rehearsal dinner invitations I did the paper cutting after the printing. For the menus I cut the paper first and then did the printing.

I didn’t really have a menu “inspiration” card, however I did reference the menu cards of weddings I had previously been to. I decided I wanted a small image/graphic at the top and then the rest of the card to have a clean look. To tie the menu card in with the rest of the wedding paper items I re-used (FREE!) fonts: Mutlu Ornamental and Adobe Pro – from the Wedding Invitations and Allegro – from the DIY Calligraphy Envelopes.

We also used the same type of paper from the wedding/rehearsal dinner invitations, but in a different color – light purple!  The light purple looked great with the gold table clothes and sterling silver roses on each of the tables.  Here’s how they looked:

Photo credit: Korie Lynn Photography

I went back and forth on rounding the edges of the menu, but in the end my mother and husband liked the non-rounded look better.

My tips are pretty much consistent with other printing related projects I’ve blogged about:

  • Print on High Resolution
  • Spell check!
  • Print tests on white paper before doing a test on your nice card stock.  White paper is far less expensive!
  • Don’t wait to the last minute.

Happy DIY and Wedding Planning!!

Did you make your own menus? Any tidbits for other brides you can share?

Don’t forget to leave your tidbit by commenting below! :)

Share

I planned a small/intimate surprise birthday party for my husband turning 30.  And let me tell you he was SHOCKED when he walked in the front door.  I decided early on that I wanted the party to be beer themed, which clearly meant the cake needed to go with the theme.  I was very inspired by a bottle cap cake I found on a blog.

Unfortunately when it came time to making the cake I didn’t have enough time to make fondant.  So I went with option B.  Swiching from a cake to cupcakes. I mean cupcakes are in anyways so win!  Then I made made little bottle cap decorations for each of the cupcakes.  They are super easy to make.  AND how cute are these???

What you need:

Toothpicks
Glue
Beer Bottle Caps

Place a small dot of your duco cement in the center of the bottle cap. Let it dry for 30 seconds or so.

Place the toothpick at an angle into the glue dot.  Roll the toothpicks in the glue a little.  Then hold it in place. Unlike my husband try to put the toothpick at an angle and against the bottle cap edge.

Instead of holding the toothpick while it drys, which takes FOREVER there’s a better option! This took me a while to figure out, but in the end it was a life saver.  Put a second bottle cap on top of the bottle cap/toothpick like so …

Let dry for at least 15 minutes.  The longer the better and depending on the glue you use they will dry at slower or faster rate than mine did.  Then stick it into the cupcake and away you go.  I think it would have been nice to have a few more different types of beer bottle caps, but over all I am very pleased with how they turned out!  Check out the little display:

The color theme of the surprise party was yellow and chocolate brown.  The cupcake liners had yellow stripes on them.  You can find them here and they are pretty cheap and come in a lot of different colors.

Remember how much I wanted to use barbershop straws again? I got them for the surprise party!!  The other small decoration included brown and yellow balloons.

Oh and one more fun little detail for the party … custom napkins!  I had wanted to do custom napkins for our wedding, but it didn’t work out. I would never plan another party without custom napkins.  I love how they turned out!!

Surprise parties are so much fun and all the little tidbits and extra details all the difference in making the party look so cute.  :)

Happy DIY and party planning!

Don’t forget to leave your tidbit by commenting below :)

Share

Shortly after getting engaged and reading (too) many wedding blogs I became obsessed with having a Candy Bar/Buffet at our wedding.  Here are two candy buffets that were part of my inspiration:

Wedding Candy Buffet

Found on WeddingBee

Wedding Candy Buffet

Found on Aisle with Style by the Photo is from Hostess Blog.

Best place to buy anthropology jars that I found was Marshall’s.  All the good jars were about $12, which isn’t too crazy.  We went to multiple Marshall’s and waited a couple of months and then went again.  It took a while to compile all the jars, but in the end all the trips were totally worth it.

Other places I found candy jars were Michael’s, Crate and Barrel, Ebay and Craigslist.  9 time out of 10 though Marshall’s had the cheapest and best options.  I would definitely suggest doing some window/online shopping before buying from anywhere.

About 6 weeks before the wedding we purchased all the candy.  That’s not to say I had already picked out the candy months before purchasing it! :)  We went with purple, white and pink candy to go with the color theme of the wedding.  Well sort of, cause pink wasn’t a wedding color … but so many good candies are pink though!

We got the bulk of the candy from Candy Warehouse.  Here is exactly what I purchased:

  • White “Just Married” Sweet Tart Circle Rolls: 5LB Bag
  • Lavender Foiled Milk Chocolate Balls: 5LB Bag
  • Princess Candy Necklaces & Bracelets: 24CT Box x5 (this was too much probably only needed x3)
  • Strawberry & Creme Salt Water Taffy Candy: 3LB Bag x2
  • Green Rind Watermelon Slices: 5LB Bag
  • Haribo Gummi Pink Grapefruit Slices: 5LB Bag

The jelly beans were slightly cheaper at Bulk Candy Store.  Here’s what I ordered:

  • Island Punch Jelly Belly: 5 lbs
  • Coconut Jelly Belly: 5 lbs
  • French Vanilla Jelly Belly: 5 lbs
  • Strawberry Daiquiri Jelly Belly: 5 lbs
Here is the candy buffet all set up at the house two days before the wedding –

Wedding Candy Buffet | Life's Tidbits

A few small tidbits to consider:

  1. I had ~100 people at the wedding and this was too much candy for the size of our wedding.
  2. If we had provided the “to go” candy boxes at the tables people who missed the candy bar/buffet might have gone to seek it out. This could have meant not so much extra candy after the wedding.
  3. Don’t open the candy until a day or two before the wedding/party as the candy could go stale.
  4. The hotel provided the scoops, which meant we didn’t have to buy any!
  5. Make sure you visit your own candy buffet! We were so busy talking and dancing I didn’t make it by the buffet and I wish I had.
  6. If you are going to make name tags for each type of candy do so ahead of time. I ran out of time the week before our wedding and that detail just didn’t make the cut.
Over all I loved how our candy buffet came out!
Wedding Candy Buffet | Life's Tidbits
Photo Credit: Wedding Guest

Wedding Candy Buffet / Candy Bar / Love it Sweet| Life's Tidbits

Photo Credit: Korie Lynn Photography

Wedding Candy Buffet | Life's Tidbits

Photo Credit: Korie Lynn Photography

I think the candy display was cute and came together how I had envisioned.  I sold all of the candy jars to a bride-to-be in the DC/VA/MD area. It felt so nice to see the HUGE smile on her face as she loaded them into her car … and how relieved she was the search for jars was over.

What extra tidbit would you have added to the candy bar/buffet?  Anyone have tips for other brides?

Happy Planning!

Signiture_Nicole


Don’t forget to leave your tidbit by commenting below :)

Share

One of my favorite party planning blogs is Hostess with the Mostess.  I recently browsing for fun party ideas and cam across this super fun blog for Guinness Stout Brownie Pretzel Bars.  I thought these were perfect for our Super Bowl party (and my husband’s beer themed birthday).  The recipe is by Esther Kang of Batch from Scratch.

Ingredients:

4 oz Bittersweet Chocolate
8 oz Butter
1 Egg
3/4 cup Sugar
1/2 cup Brown Sugar
1/4 cup Cocoa
1 1/4 cup Flour
1/2 tsp Salt
2 tsp Vanilla
1 cup Guinness
8 oz Semi Sweet Chocolate Chips
3.5 oz Butterscotch
2.5 oz White Chocolate Chips
1.4 oz Heavy Cream

Place the bittersweet chocolate & butter in a bowl.

Melt in microwave or double boiler.

Using a mixer beat egg, sugar and brown sugar for 3 minutes.

Mix dry ingredients together in a bowl cocoa, flour, salt.  Add the melted chocolate to egg mixture then mix in dry ingredients.  Last add vanilla and beer mixing until incorporated.  Pour into a 9×13 pan.

Sprinkle semi-sweet chocolate on top of the batter.  Then pop it in the over at 350 for 35 minutes or until a toothpick comes out clean.

To make the butterscotch ganache combine butterscotch, white chocolate and heavy cream in a small bowl.  Microwave in 30 second increments, stir until melted and smooth.  I heated mine for a little over a minute, however make sure not to over heat them or it will go ALL over you microwave and you will loose a lot of the ganache (can you tell this happened to me?? Hahaha). Spread the ganache over the cooked brownie.  Refrigerate until firm.  Then cut into small bites and serve.

The blog suggests topping with 1/3 cup Crushed Pretzels and Flakey Sea Salt  (maldon salt works well).  I should have put the pretzels on while the ganache was still a little warm because I couldn’t get the pretzels to stay on the brownie bits after they were totally cooled.

Here are the YUMMY Guinness Brownie Bits …

The brownies were a big hit and perfect for both the super bowl and birthday parties.

Happy Cooking & Party Planning!

Don’t forget to leave your tidbit by commenting below :)

Related Posts Plugin for WordPress, Blogger...
Share